1. Before you start
GlacierPoint Scan has two parts. The collector is a single Windows program that reads your Active Directory, your Windows hosts and your Microsoft 365 tenant, encrypts what it read and uploads it. The portal, in your browser, is your workspace: it approves each collection, turns the evidence into the reports and keeps them.
What the collector needs
- A Windows 10 or Windows 11 computer, or Windows Server 2019 or later, with Windows PowerShell 5.1 (included in all of them). For the on-premises track, the computer is joined to the domain you assess.
- For Active Directory and Windows hosts: a domain account that can read the directory. Start the collector as administrator for the fullest evidence about the computer it runs on. Remote hosts need WinRM, domain DNS and administrative rights for the account you run as.
- For Microsoft 365: an account with the Global Reader role to sign in, and a Global Administrator once, to grant the collector's read-only permissions in your tenant.
- For Exchange Online, Purview and Teams: Microsoft's PowerShell modules (ExchangeOnlineManagement and MicrosoftTeams). The collector checks for them and offers Install for this user, which installs them for your Windows account only.
- Outbound HTTPS from that computer to the portal, so that it can pair and upload.
What it never does
- It writes nothing during an assessment: no changes in the directory, on the hosts or in the tenant. Directory queries use signed and sealed LDAP, remote hosts are read through Kerberos WinRM, and only Get-* cmdlets run in Microsoft 365.
- It does not ask for or store passwords, retrieve LAPS passwords or decrypt Group Policy Preferences credentials. Microsoft sign-in happens on Microsoft's own page, and its tokens stay in memory for the run.
- Remediation is a separate step: a signed plan that you review and approve in the portal, executed only after you confirm it in the collector (chapter 7).
What it does on your network
- For each remote host you select, it opens a short TCP connection to ports 21, 23, 443, 636, 1433, 3306 and 5432 to see which answer, and reads the TLS certificate where one is offered. It sends no credentials and no data to those services. Your monitoring may log these connections from the collecting computer.
- For Microsoft 365, it looks up the public DNS TXT records (SPF and DMARC) of your accepted domains.
- It installs the Exchange Online and Teams PowerShell modules from the PowerShell Gallery only when you press Install or Update on the Modules card.
- It talks to the portal over HTTPS to pair, to upload the encrypted evidence and to check for a newer version.
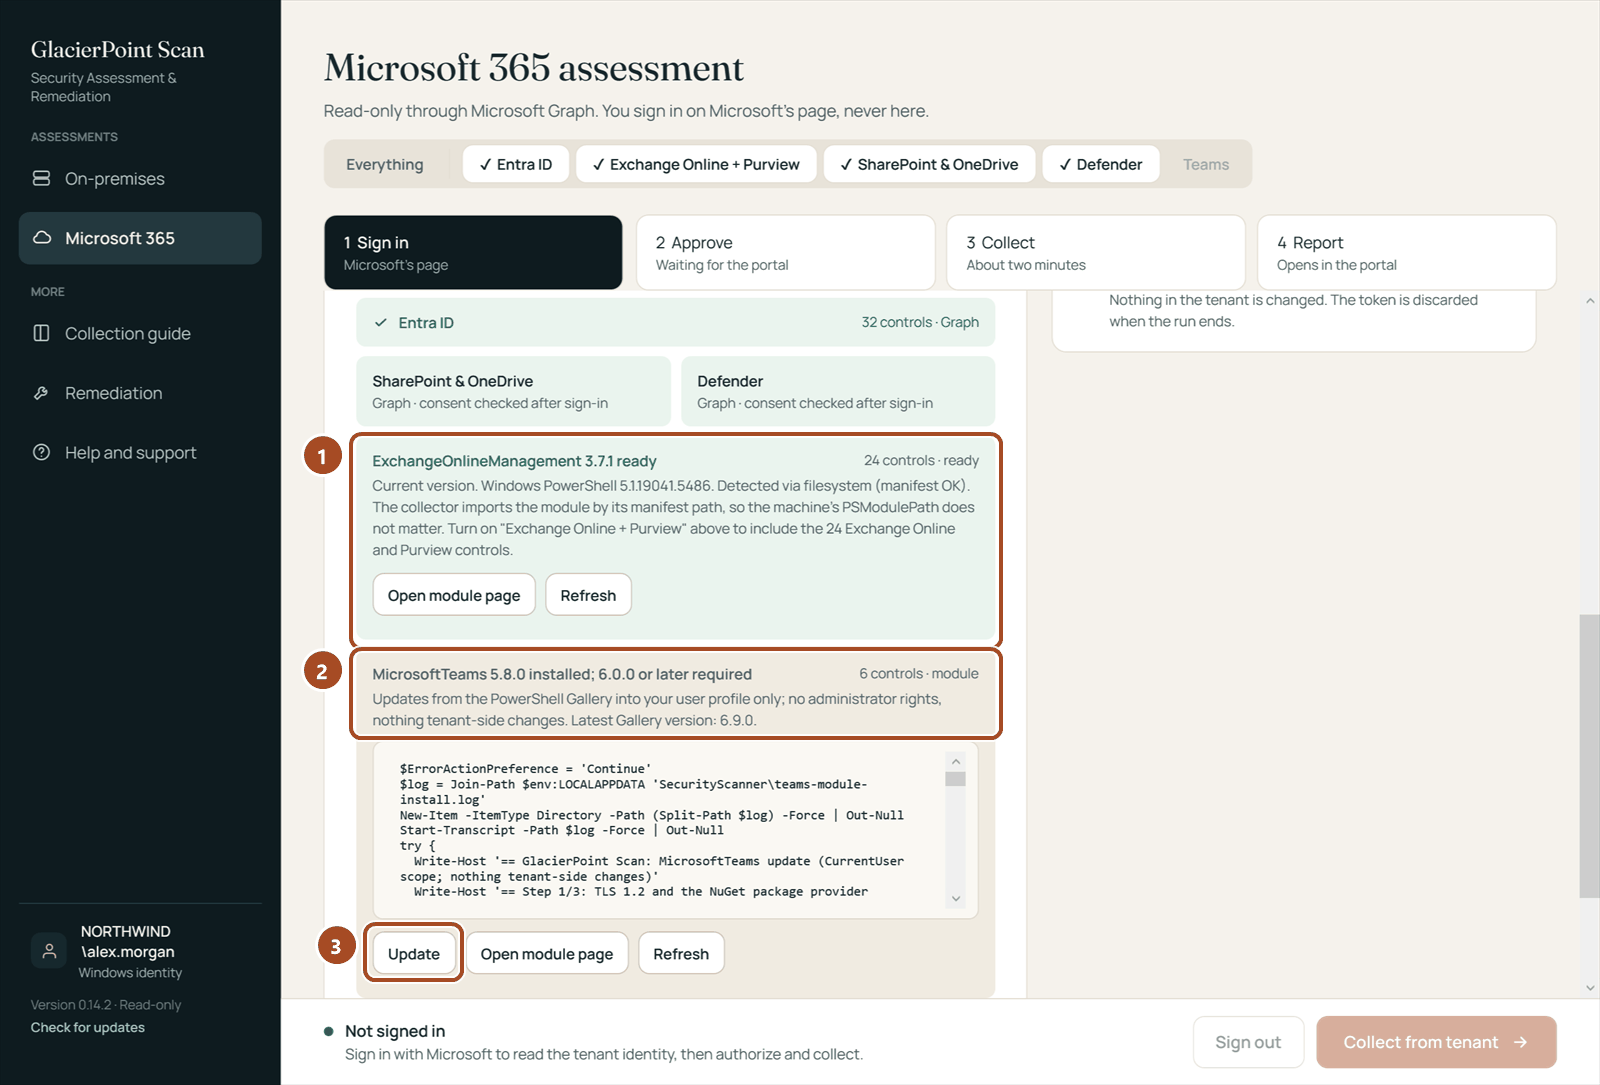
- 1ExchangeOnlineManagement installed and ready: the Exchange Online and Purview controls can be collected.
- 2MicrosoftTeams installed, but older than the version the collector needs.
- 3Update installs the newer module for your Windows account only (Install for this user when the module is missing).
What you should see: a Windows computer that meets the list above, and the accounts for the tracks you want to assess at hand.
2. Sign in to the portal and add your environment
The portal signs you in with a code sent by email; there is no password to set. An environment is one Active Directory domain or one Microsoft 365 tenant; a domain and its tenant, once linked, are one environment.
- Open https://scan.glacierpointtech.com/login and choose Email me a one-time code. Enter the email address of your workspace and choose Send the code.
- Type the six-digit code from the email and choose Verify and continue. The code works once and expires after ten minutes.
- Open Settings in the portal's menu. Your workspace is the one you created when you signed up, or one a colleague invited you to and you accepted (chapter 8).
- Under Domains and tenants you assess, check that your environment is listed. To add one, an owner enters the Active Directory DNS domain (for example
corp.example.com) or, for Microsoft 365 only, the tenant's initial domain ending in.onmicrosoft.com, and chooses Add. - If you assess both your Active Directory domain and its Microsoft 365 tenant, an owner links them under Link your Microsoft 365 tenant to this domain: choose the domain, pick the tenant or type its
.onmicrosoft.comdomain, and choose Link. The pair then shows as one environment, for examplecorp.example.com + contoso.onmicrosoft.com (Microsoft 365), with one plan and one count of collections. A tenant that already has a plan of its own is linked by support. - If you added your Microsoft 365 tenant first, link from the tenant instead: under Link your Active Directory domain to this tenant, choose the tenant, type the domain's DNS name (for example
corp.example.com) and choose Link. The domain is added and linked in one step, also in a preview workspace, and the pair keeps the tenant's plan and the collections already used. A domain that already has a plan of its own is linked by support.
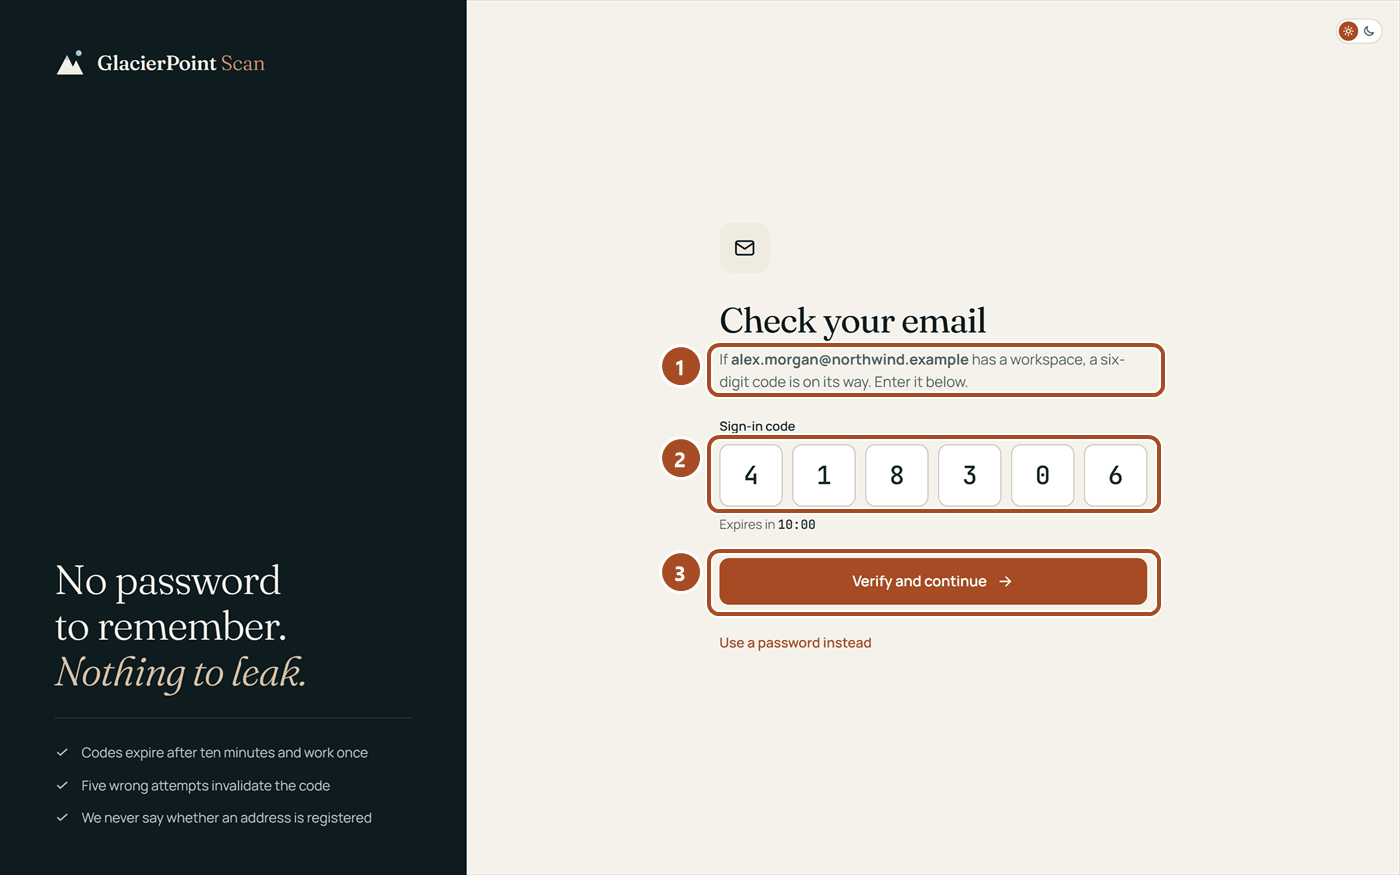
- 1The address the code was sent to.
- 2The six-digit code from the email; it works once and expires after ten minutes.
- 3Verify and continue signs you in.
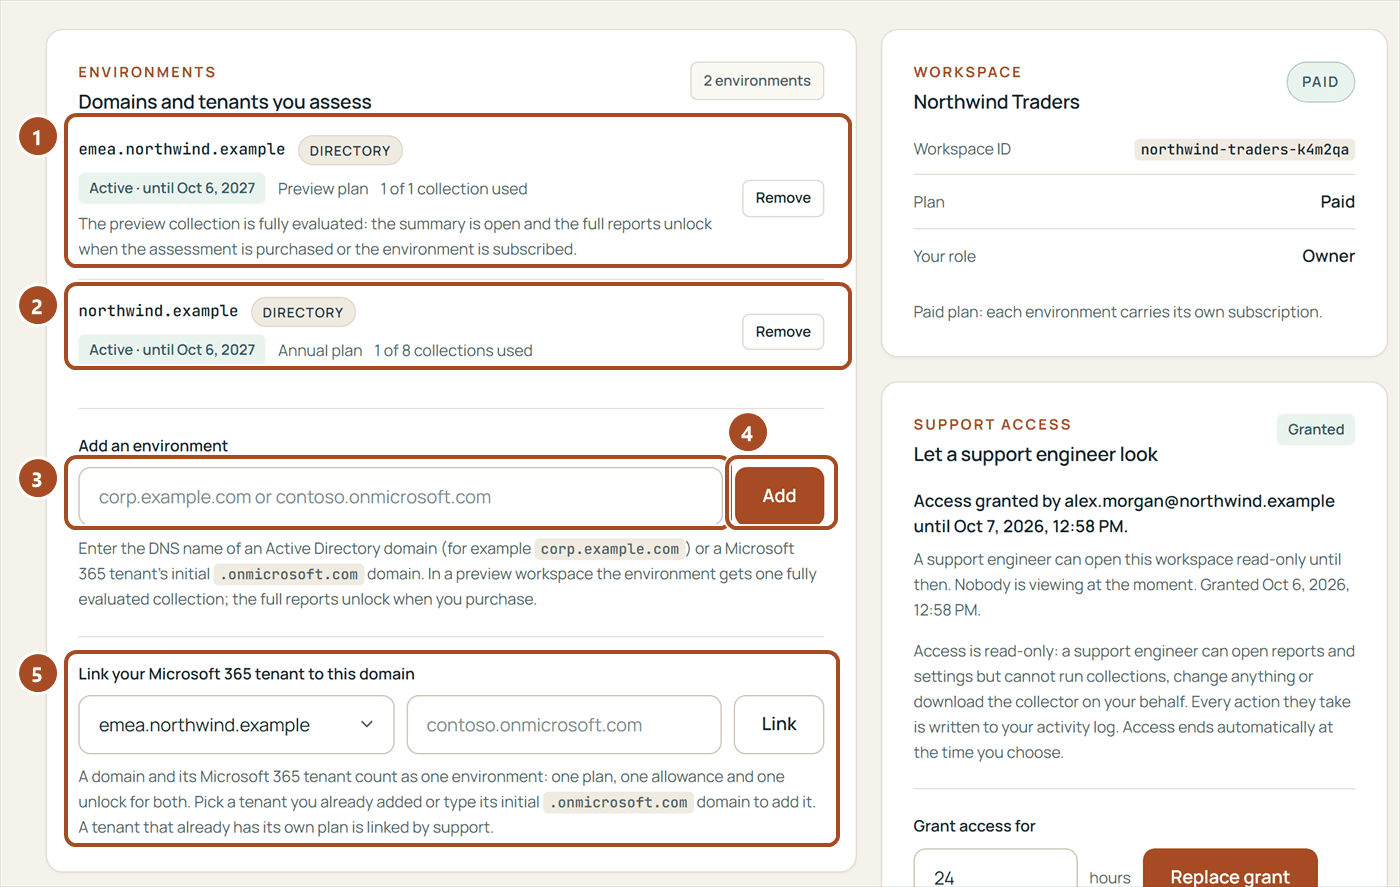
- 1An environment on the preview plan: its first collection is fully evaluated, and its reports unlock with a purchase.
- 2An environment on the Annual plan, with its term and the collections used.
- 3The Active Directory DNS domain, or the tenant's initial
.onmicrosoft.comdomain, to add. - 4Add (owners only).
- 5Link your Microsoft 365 tenant to this domain: choose the domain, type or pick the tenant and choose Link. A domain and its linked tenant count as one environment, with one plan and one unlock for both.
What you should see: your environment in Settings with its plan (One-time assessment, Annual or MSP) and the collections used so far.
3. Download the collector and pair it
The collector is one portable program; there is nothing to install. Every collection is paired with your workspace through a short code that you approve in the portal, so evidence can only reach your workspace.
- Signed in to the portal, choose Download Windows collector on the Assessments page or on the Help page, or open https://scan.glacierpointtech.com/download. The file name carries the version:
GlacierPointScan-0.14.2.exe. - Copy it to the computer from chapter 1 and start it. In its menu, Check for updates compares your copy with the version the portal serves and offers the newer one.
- Choose the scope (chapter 4) and start the run. The collector shows an eight-character pairing code and opens the portal's Connect your collector page in your browser.
- In the portal, enter the code if it is not filled in, choose Review request and check where and when the request came from, and the domain, the controller, the hosts and the tenant it names. Approve only a request from your own collector.
- Choose Approve this assessment. A code that nobody approves expires after ten minutes; once approved, the collection must start within thirty minutes.
When the portal has Terms of Service in force that you have not yet accepted on this computer, the collector shows them before its first pairing: choose Accept to continue, or Quit to close it without pairing. It asks again only when the portal publishes a new version of the terms.
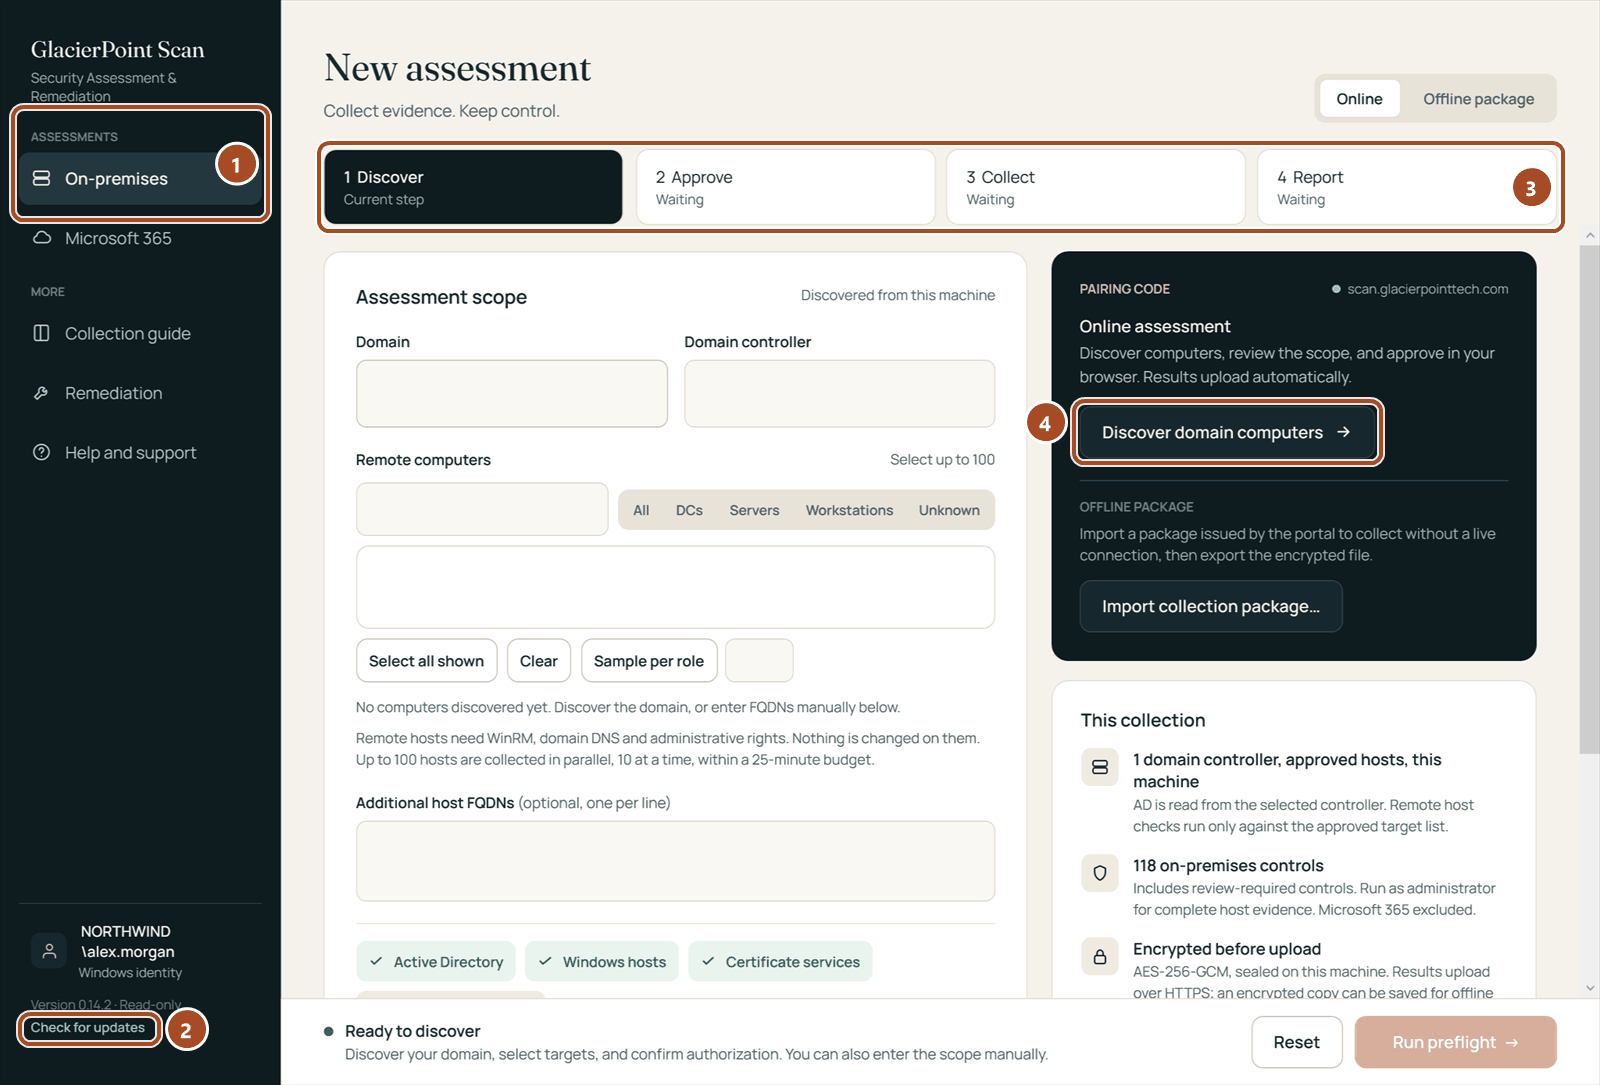
- 1The two assessment screens, On-premises and Microsoft 365 (chapter 4).
- 2Check for updates compares your copy with the version the portal serves.
- 3The four steps of a run: Discover, Approve, Collect, Report.
- 4Discover domain computers starts the on-premises scope.
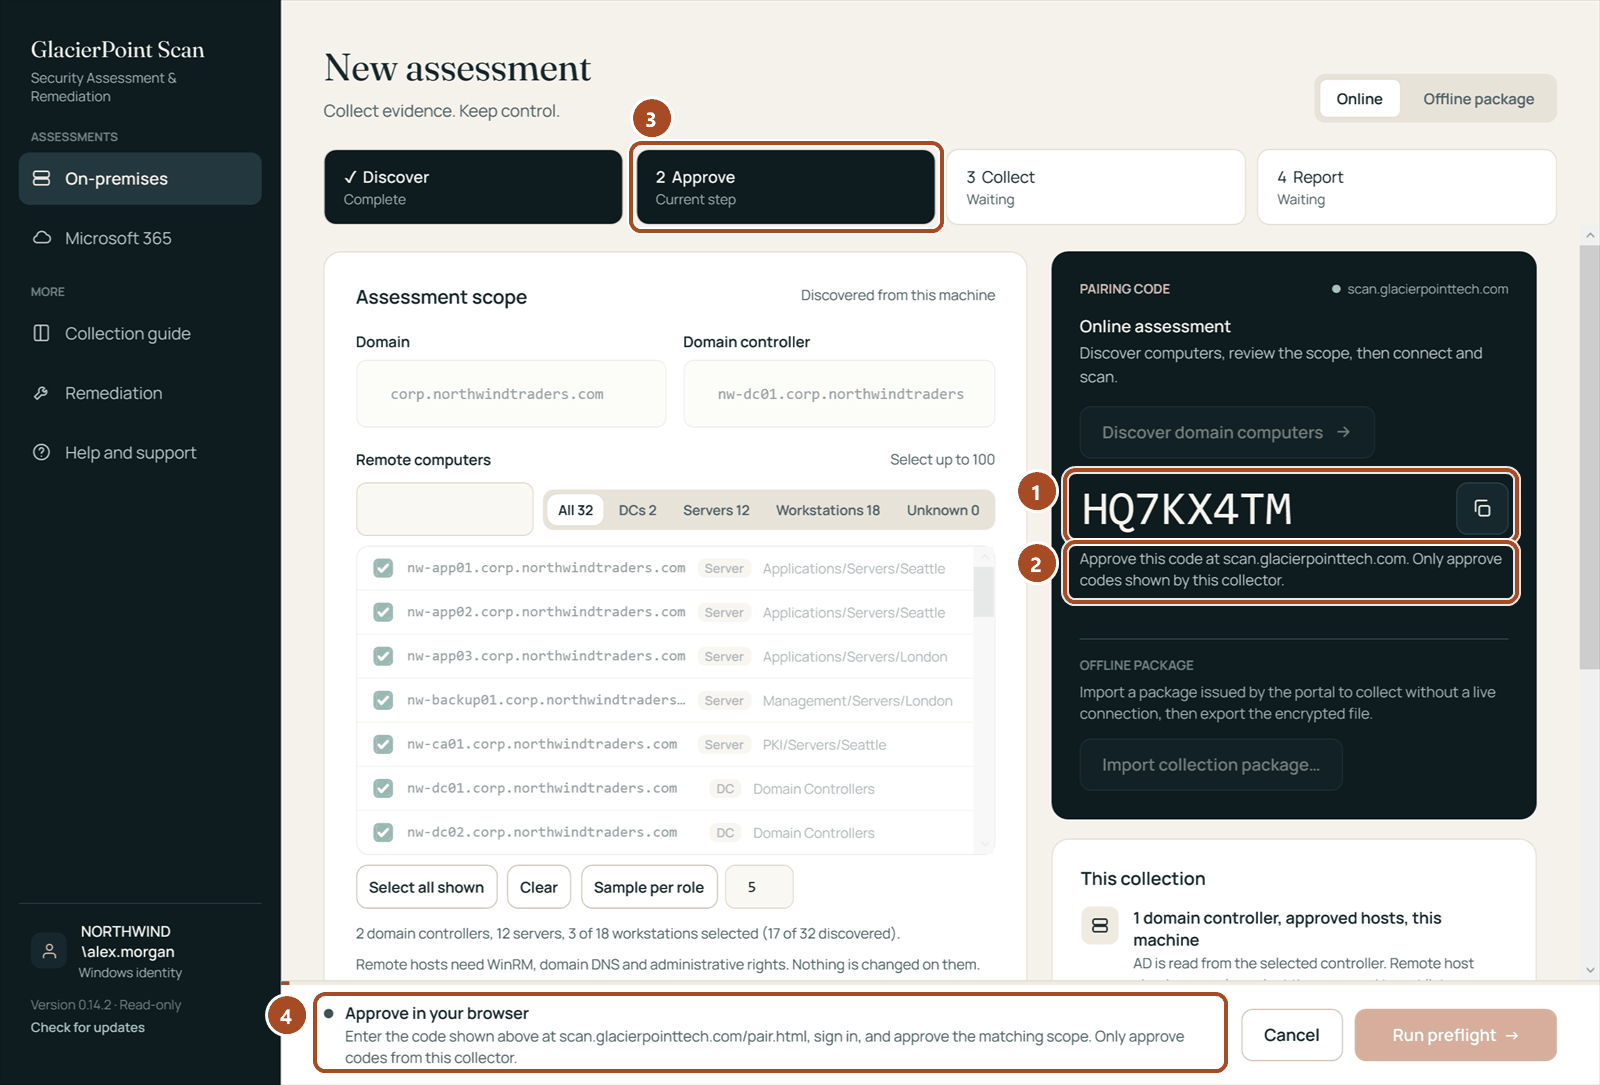
- 1The pairing code, with a button to copy it.
- 2Where to approve it: the portal's Connect your collector page.
- 3The run waits at Approve until the code is approved.
- 4The status line says what the collector is waiting for.
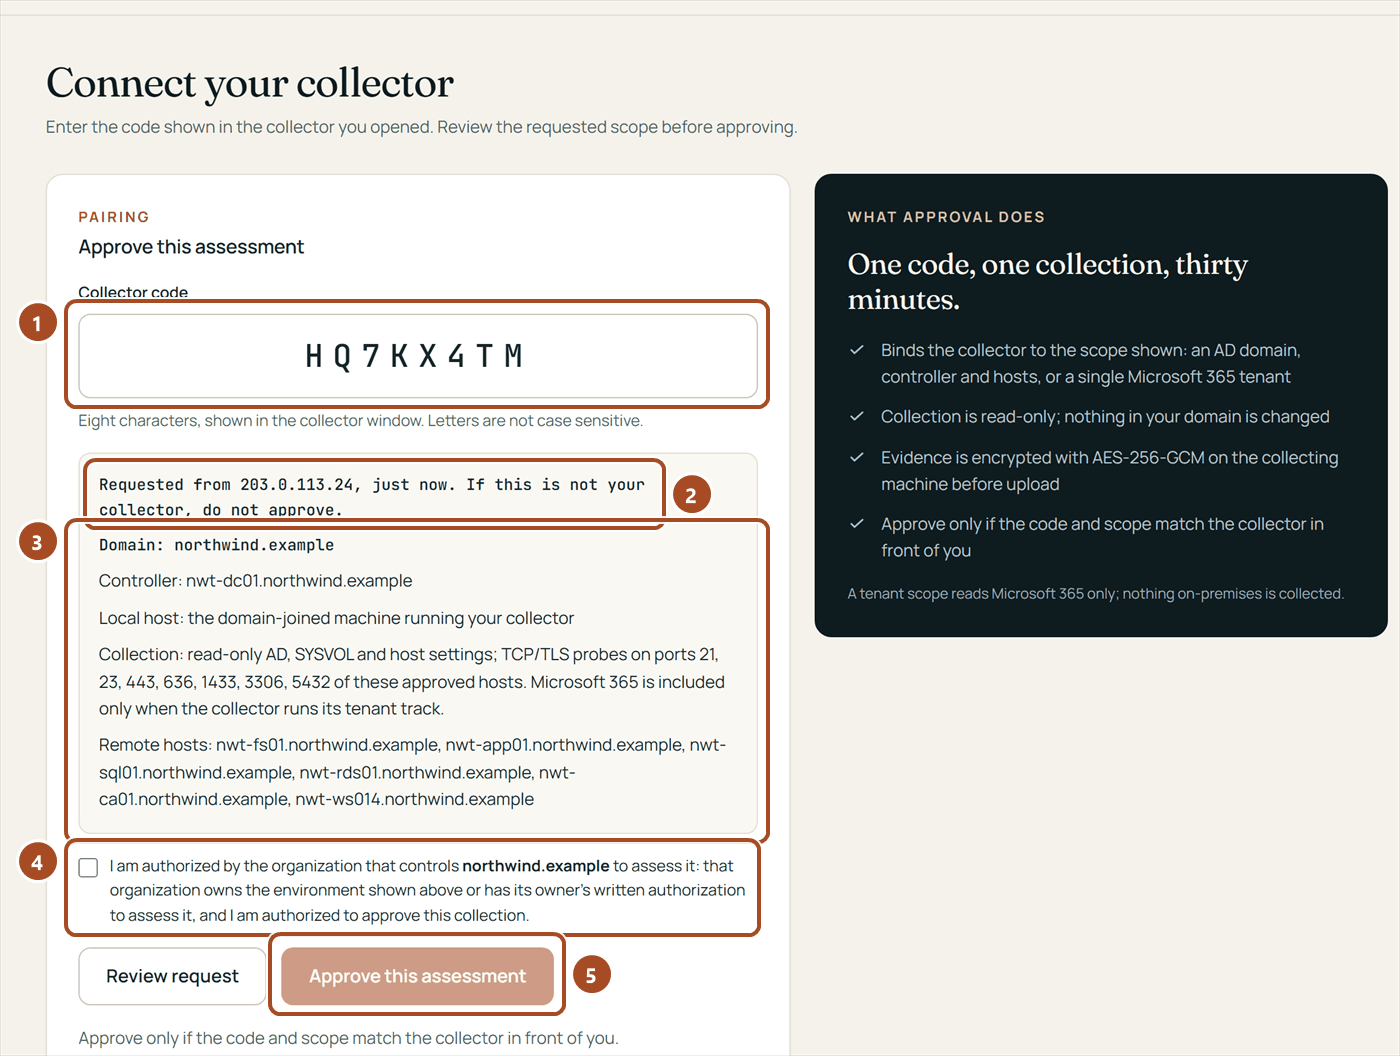
- 1The code from the collector, filled in when the collector opens the page.
- 2Who asked: the address the collector started the pairing from, and how long ago. If it is not your collector, do not approve.
- 3The requested scope: the domain, the domain controller, the local host, what the collector will collect and the remote hosts.
- 4The authorization checkbox: tick it to confirm that the organization that controls the domain has authorized the assessment.
- 5Approve this assessment, once the code and the scope match your collector.
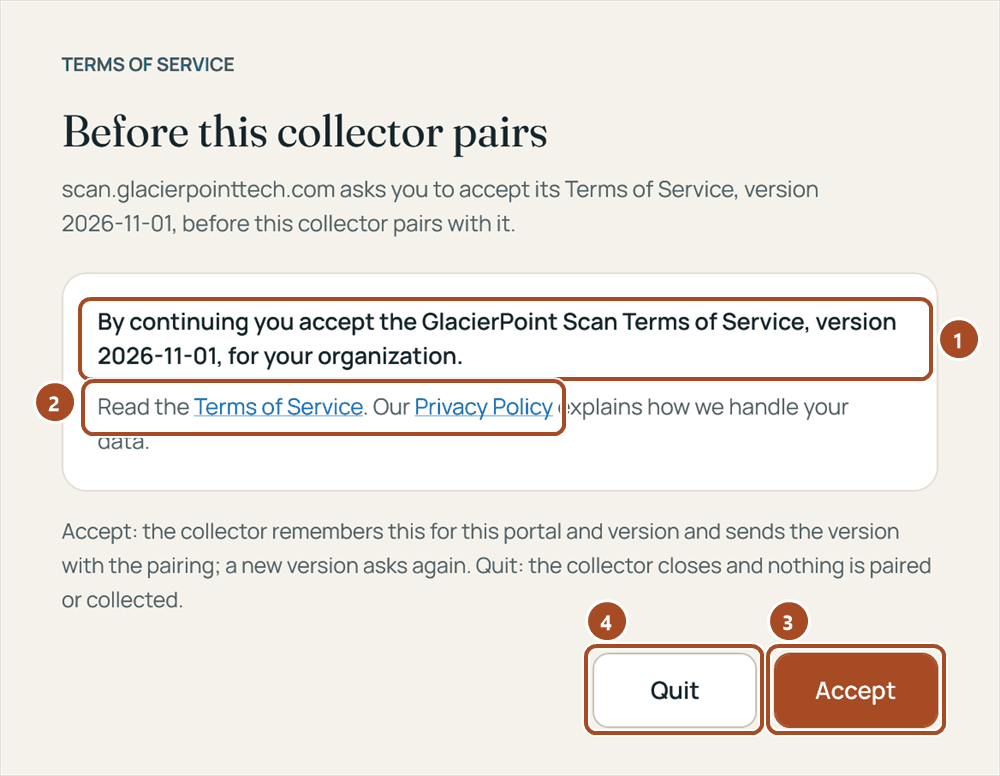
- 1What you accept: the Terms of Service of the version the portal names, for your organization.
- 2The Terms of Service and the Privacy Policy open in your browser.
- 3Accept: the collector remembers it for this portal and version and pairs.
- 4Quit closes the collector; nothing is paired or collected.
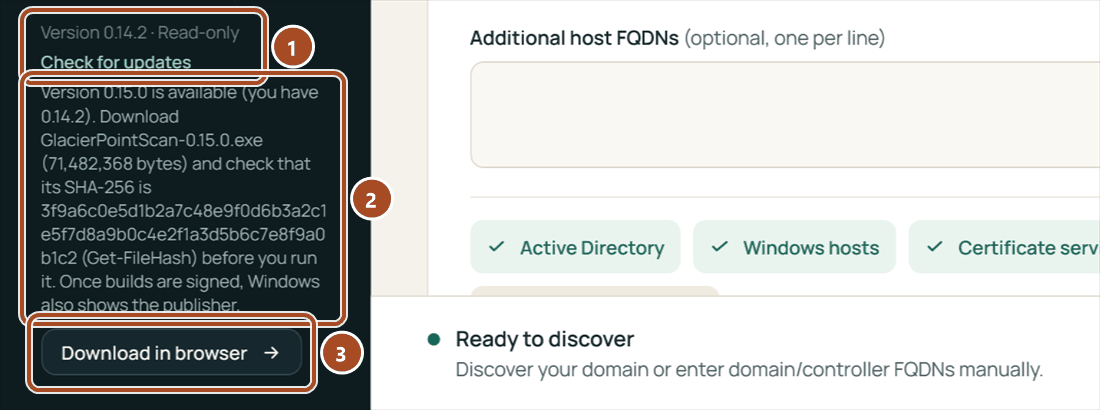
- 1The version you run, and Check for updates.
- 2The newer version, the name and size of its file, and the SHA-256 the download must have.
- 3Download in browser fetches it from the portal.
What you should see: the same code in the collector and in the portal, and after the approval the collector moving on to Collect by itself.
4. Run an assessment
The collector has two assessment screens in its menu: On-premises (Active Directory, Windows hosts, certificate services) and Microsoft 365. Each one runs in four steps: Discover or Sign in, Approve, Collect, Report.
On-premises: choose the hosts
- Choose Discover domain computers. The domain and a domain controller are filled in from the computer you are on.
- Select up to 100 remote computers: filter by Servers, Workstations or Unknown, then Select all shown, Sample per role or pick them one by one. Hosts that were not discovered can be typed under Additional host FQDNs.
- Tick I authorize read-only collection and choose Connect and scan, then approve the pairing code (chapter 3).
Microsoft 365: choose the workloads
- Choose Sign in to Microsoft and sign in on Microsoft's page in your browser.
- Choose Everything to include every workload whose requirements are met, or switch on Exchange Online + Purview, SharePoint & OneDrive, Defender and Teams one by one. Entra ID is always included.
- Exchange Online + Purview and Teams may ask you to sign in again on Microsoft's page for their own services, unless your organization registered its own app for a single sign-in.
- Tick I authorize read-only collection, choose Collect from tenant and approve the code in the portal. To assess a domain and its tenant together, tick Also collect on-premises evidence from this machine.
While it runs
- The step bar shows where the run is, and the status line names what is being read: the directory, the hosts, the tenant and each workload, then the upload.
- Remote hosts are read ten at a time. Each host gets up to 90 seconds and the whole collection has a 25-minute budget; a host that does not answer is reported as not collected rather than holding up the rest.
- Everything is encrypted on the computer (AES-256-GCM) before it leaves, and uploads by itself when the collection ends. If the upload fails, Retry upload sends it again; Save encrypted copy keeps a file you can import in the portal later.
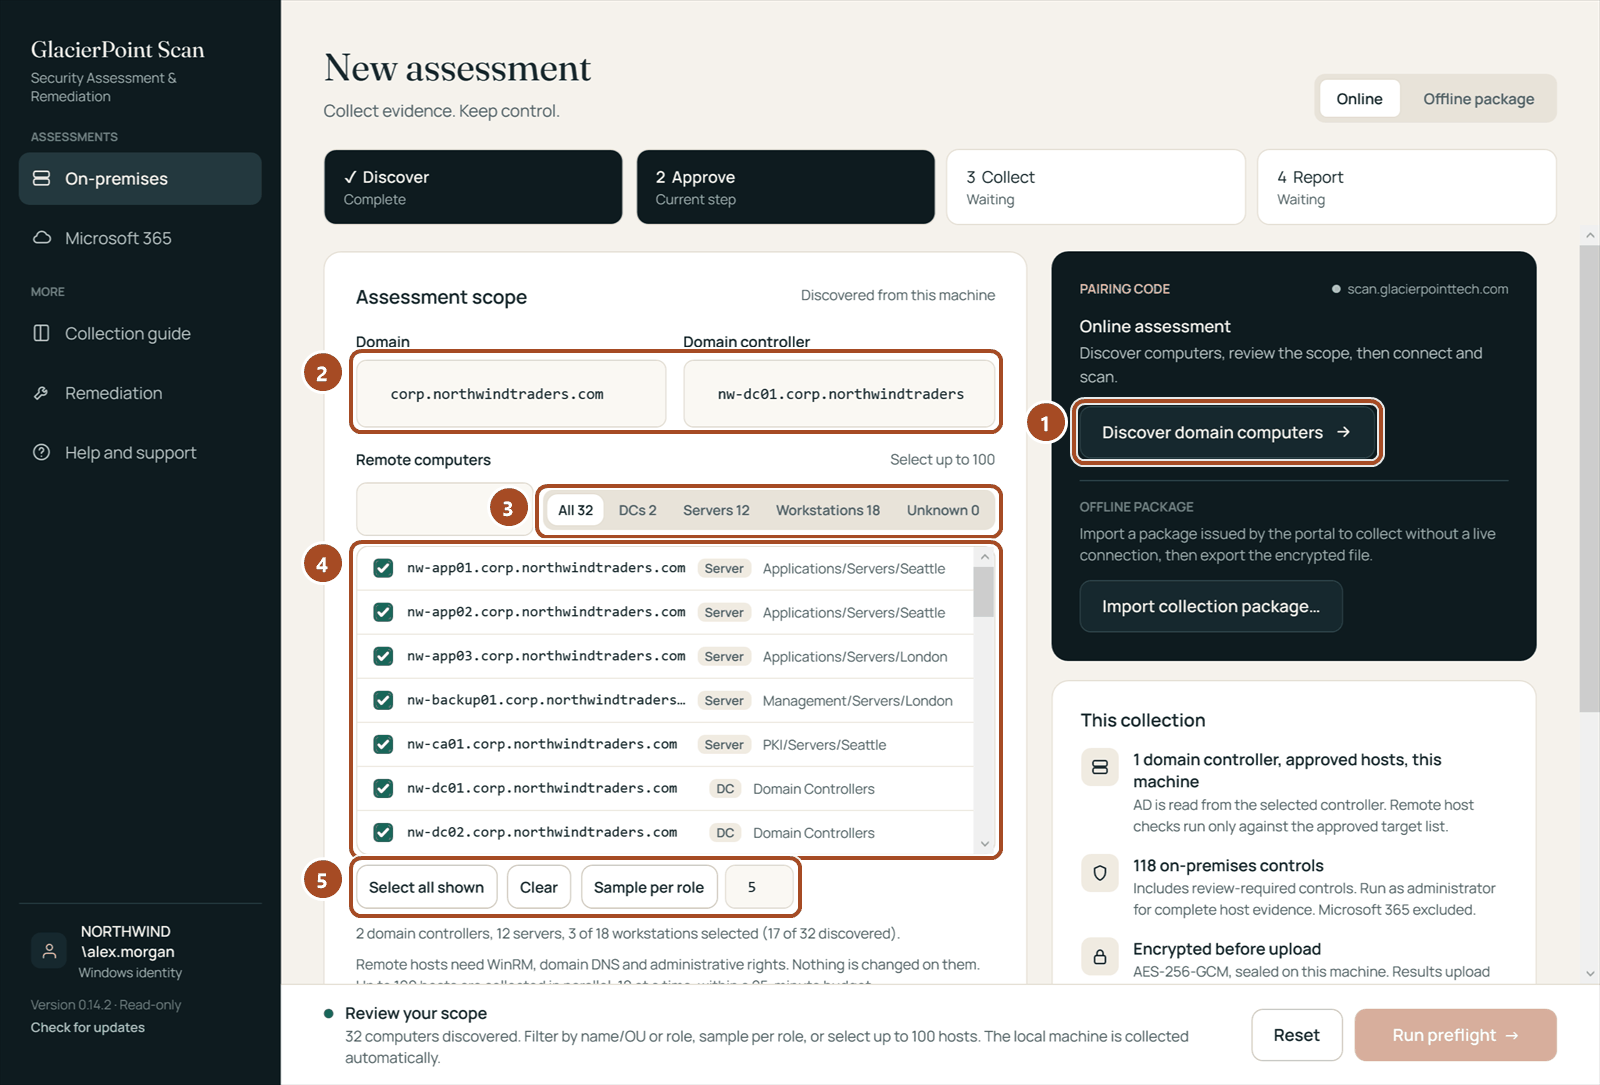
- 1Discover domain computers.
- 2The domain and a domain controller, filled in from the computer you are on.
- 3The role filter: DCs, Servers, Workstations, Unknown.
- 4The discovered computers; tick the ones to read, up to 100.
- 5Select all shown, Clear, and Sample per role with the number per role.
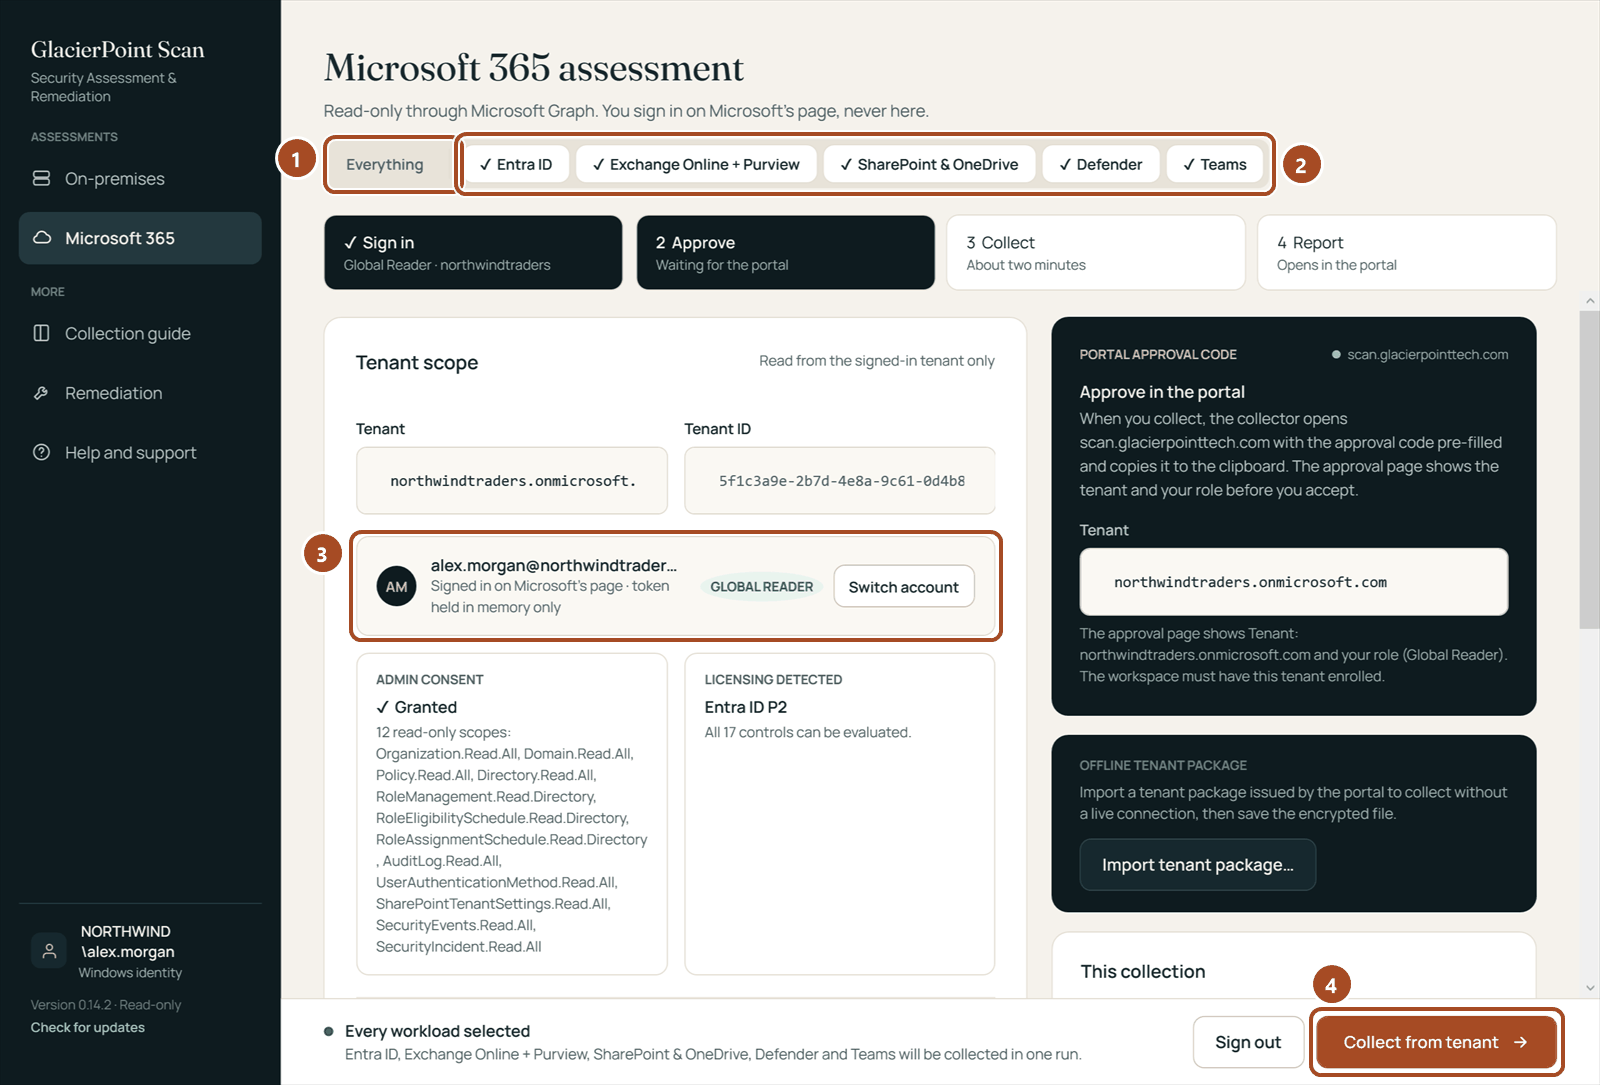
- 1Everything switches on every workload whose requirements are met.
- 2The workloads one by one; Entra ID is always included.
- 3The account you signed in with on Microsoft's page, and its role.
- 4Collect from tenant, once you tick the authorization.
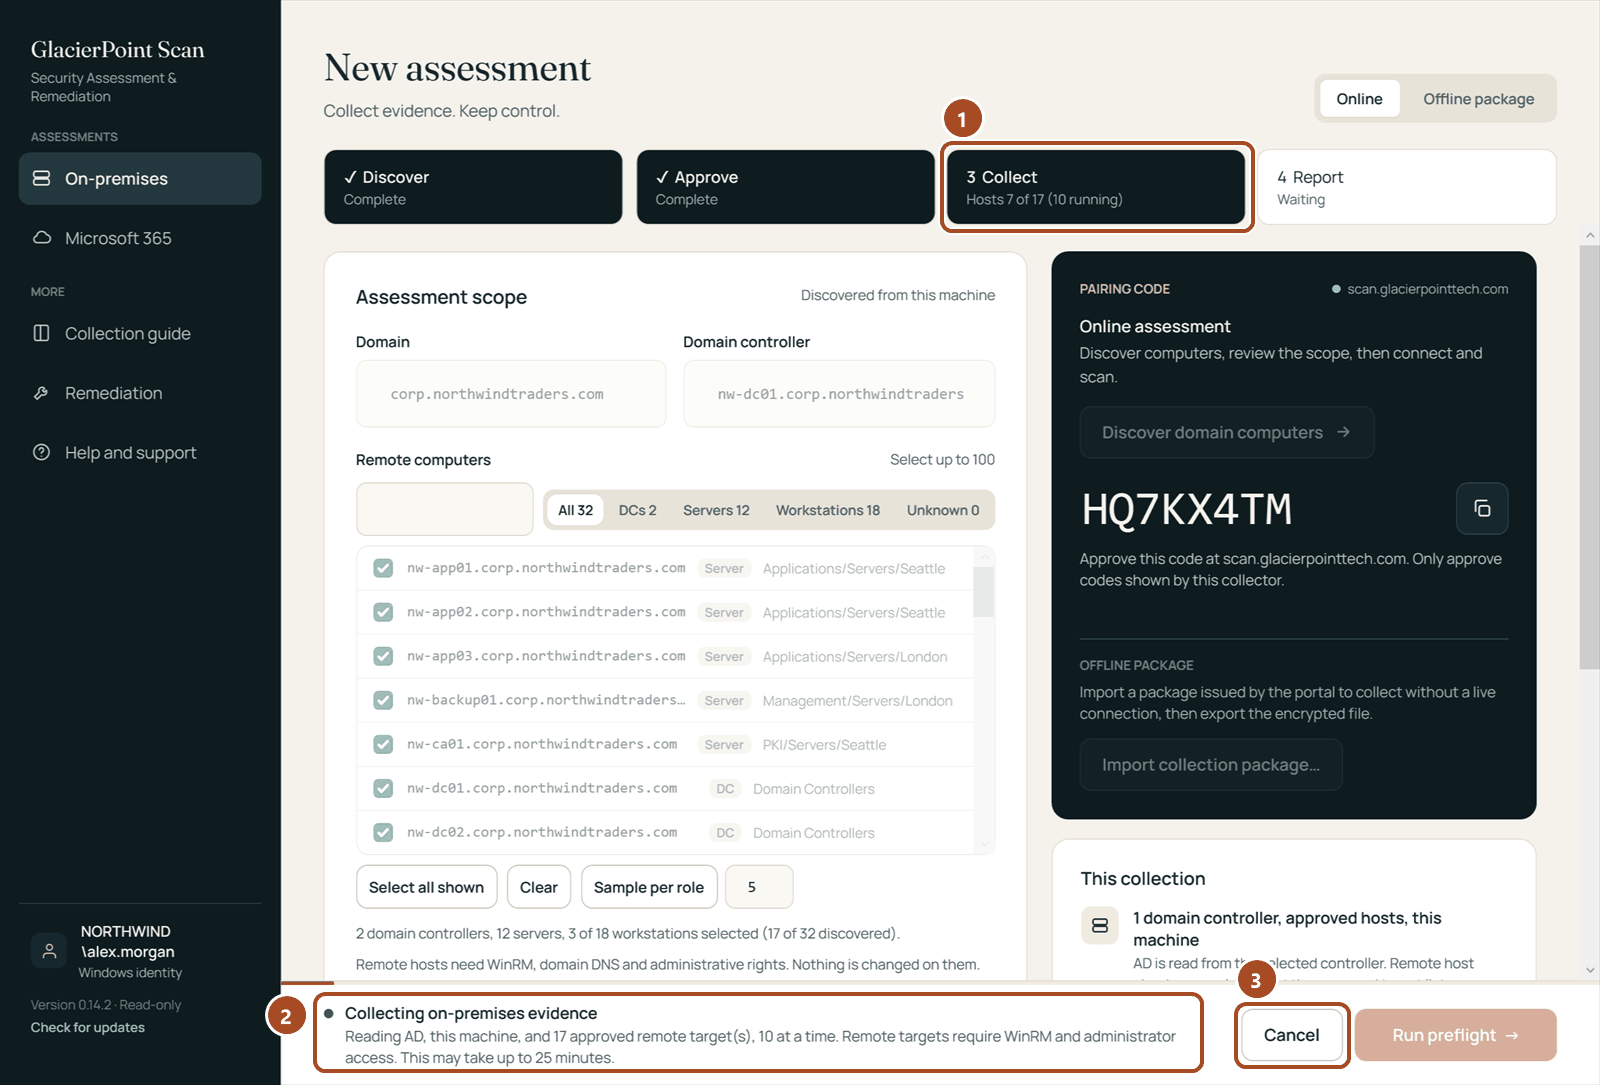
- 1The Collect step and the hosts read so far.
- 2What is being read now, and the time budget.
- 3Cancel stops the run.
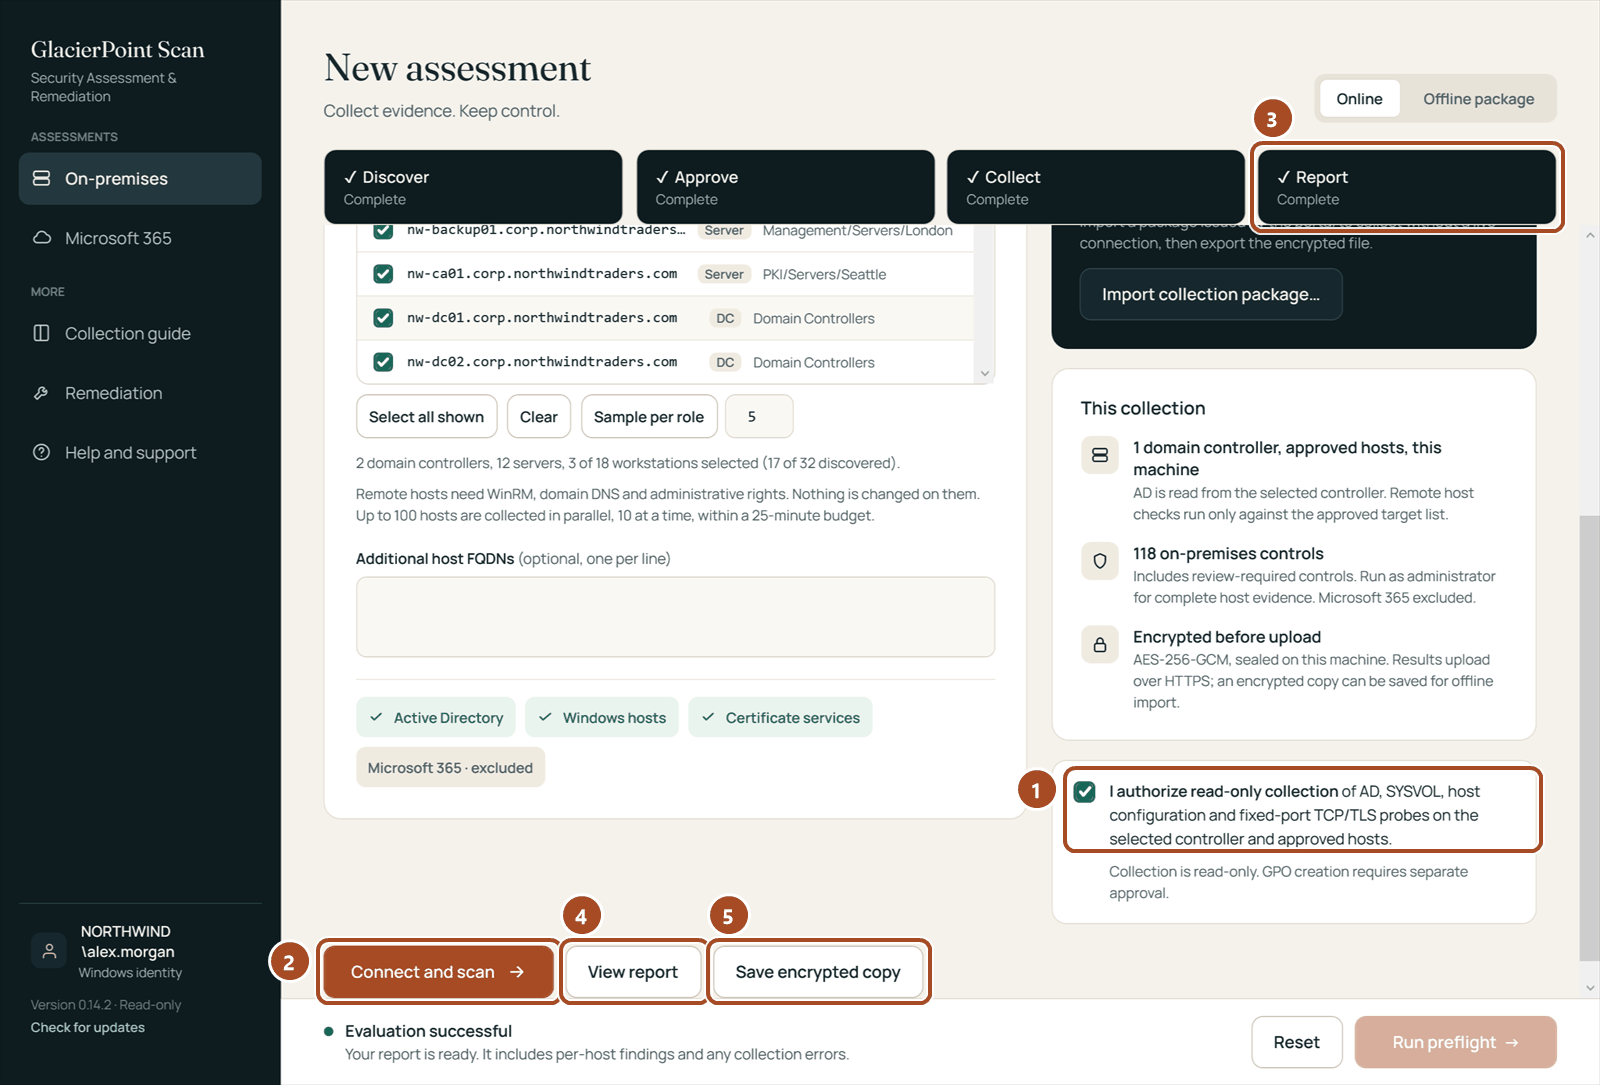
- 1I authorize read-only collection, ticked before the run.
- 2Connect and scan starts the run and its pairing code.
- 3Report: complete once the portal has evaluated the upload.
- 4View report opens the report in the portal.
- 5Save encrypted copy keeps a file you can import in the portal later.
What you should see: the Report step reached and a View report button, or, for a first collection still in preview, Open the portal.
5. Read the results
Every collection becomes one report in the portal, kept for the report retention period (chapter 9). Open Assessments in the portal; the newest report is at the top.
- Read the summary at the top of Assessments: the counts by outcome, the hosts covered and the posture panel, which shows every result by outcome and the failed results by severity. A setting that could not be read is reported as such, never counted as a pass.
- Download the executive brief, four pages for the person who decides: page 1 is the summary of the posture; pages 2 and 3 are the priorities by workstream, each with what was observed and what to do; page 4 is a 30/60/90-day delivery plan and how complete the evidence was.
- Download the technical report for the people who fix things: contents, matrices of each control across every host, every finding with its evidence, and the per-host and tenant inventories. A report with both tracks also comes as an on-premises volume and a Microsoft 365 volume.
- For more than eight hosts, open Hosts under the report to read the results of one computer at a time.
The preview of a first collection
When your workspace was created at sign-up, the first collection of an environment is a preview: fully evaluated, with the counts, the posture panel, the three leading workstreams and the first two failed controls open. Both reports, the per-host results, completion runs' output and remediation stay locked. Your purchase unlocks that same report; nothing is collected again. To buy from the portal, choose Unlock and Request an invoice.
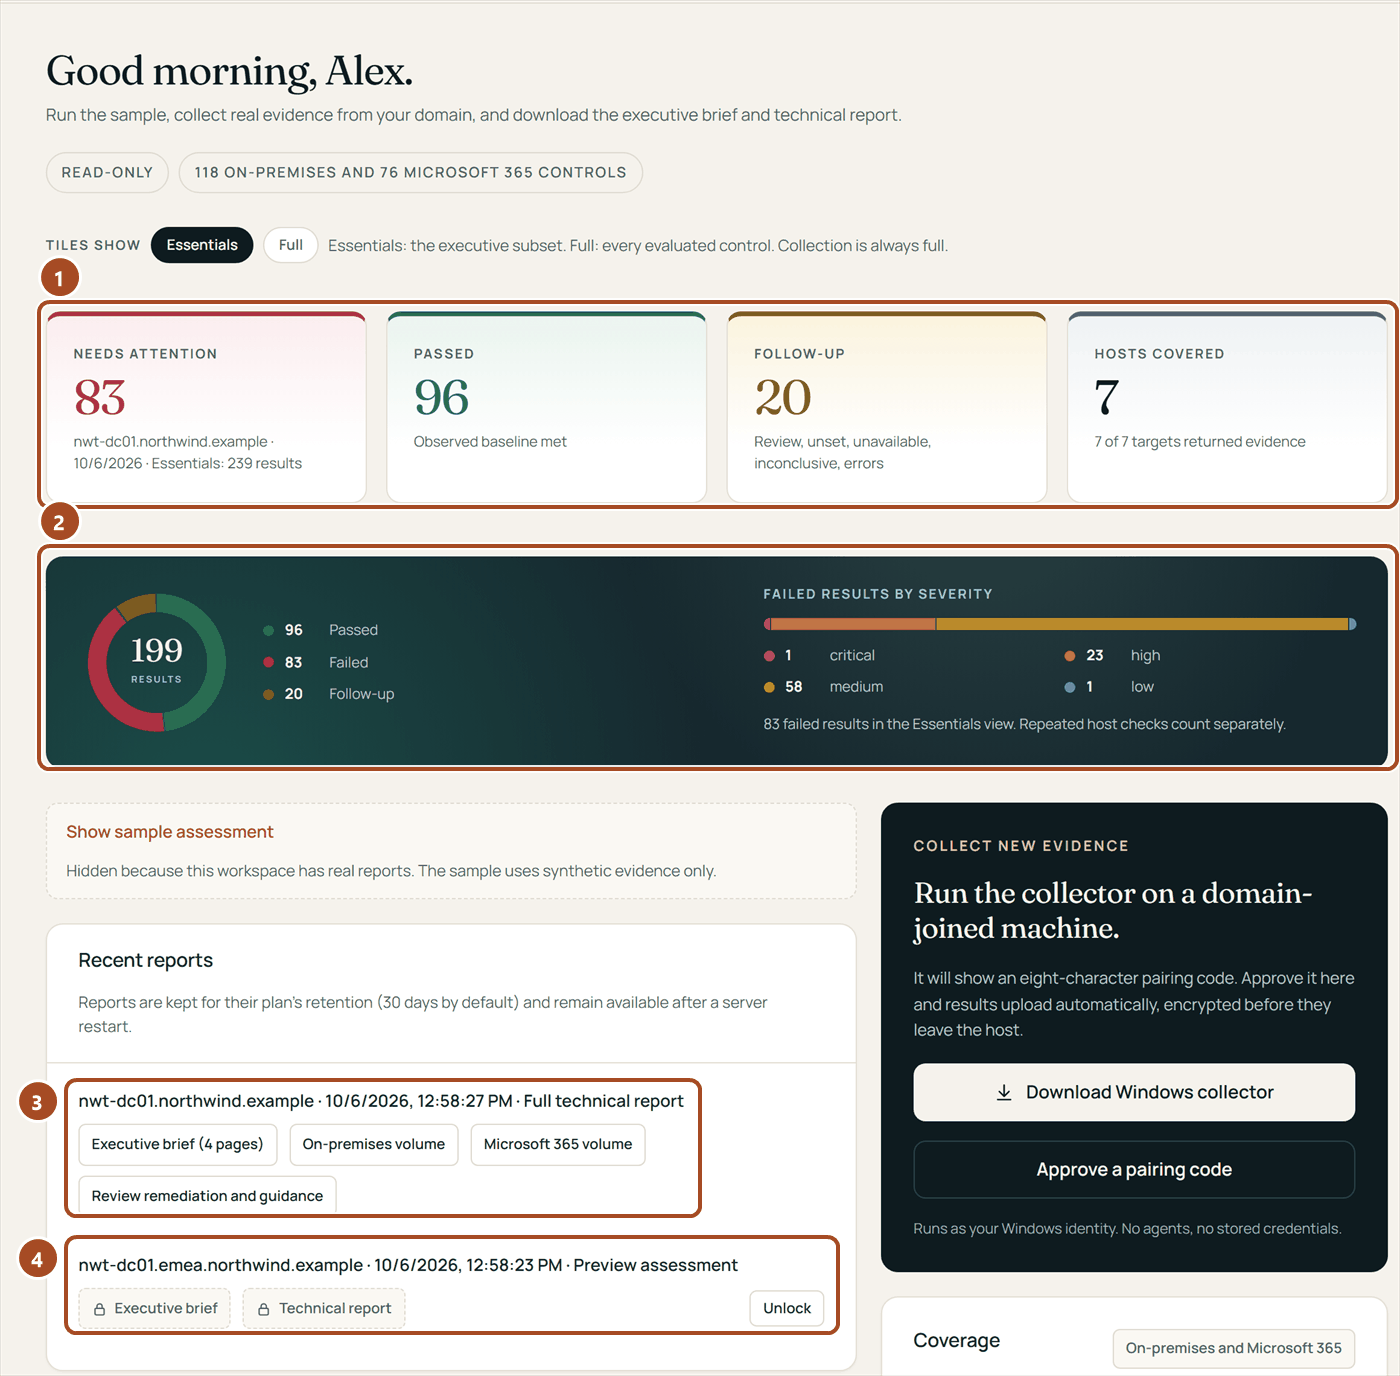
- 1The summary: results by outcome, and the hosts covered.
- 2The posture panel: every result by outcome, and the failed results by severity.
- 3The report and its downloads: the executive brief, the technical report volumes, and the link to remediation.
- 4A preview report: its downloads are locked until you choose Unlock.
What you should see: your report at the top of Assessments with download links for the executive brief and the technical report.
6. Complete a report with missing parts
Sometimes part of a collection does not arrive: a host that timed out, a workload whose module was missing, a sign-in that failed. The report lists those parts as not collected. A completion run collects only the missing parts and adds them to the same report.
- Start the collector on the same computer. It remembers the last report and shows an amber banner: Complete report with the parts still missing.
- Fix the cause first: switch the host on, install the module, or sign in with the right account.
- Choose Complete report. The collector selects exactly the missing hosts or workloads.
- Approve the code in the portal. The request says Completes report and names the parts it will add.
The portal merges the new evidence into the report, evaluates it again and saves it as the next revision. Earlier revisions stay downloadable. A completion run never counts as a new collection.
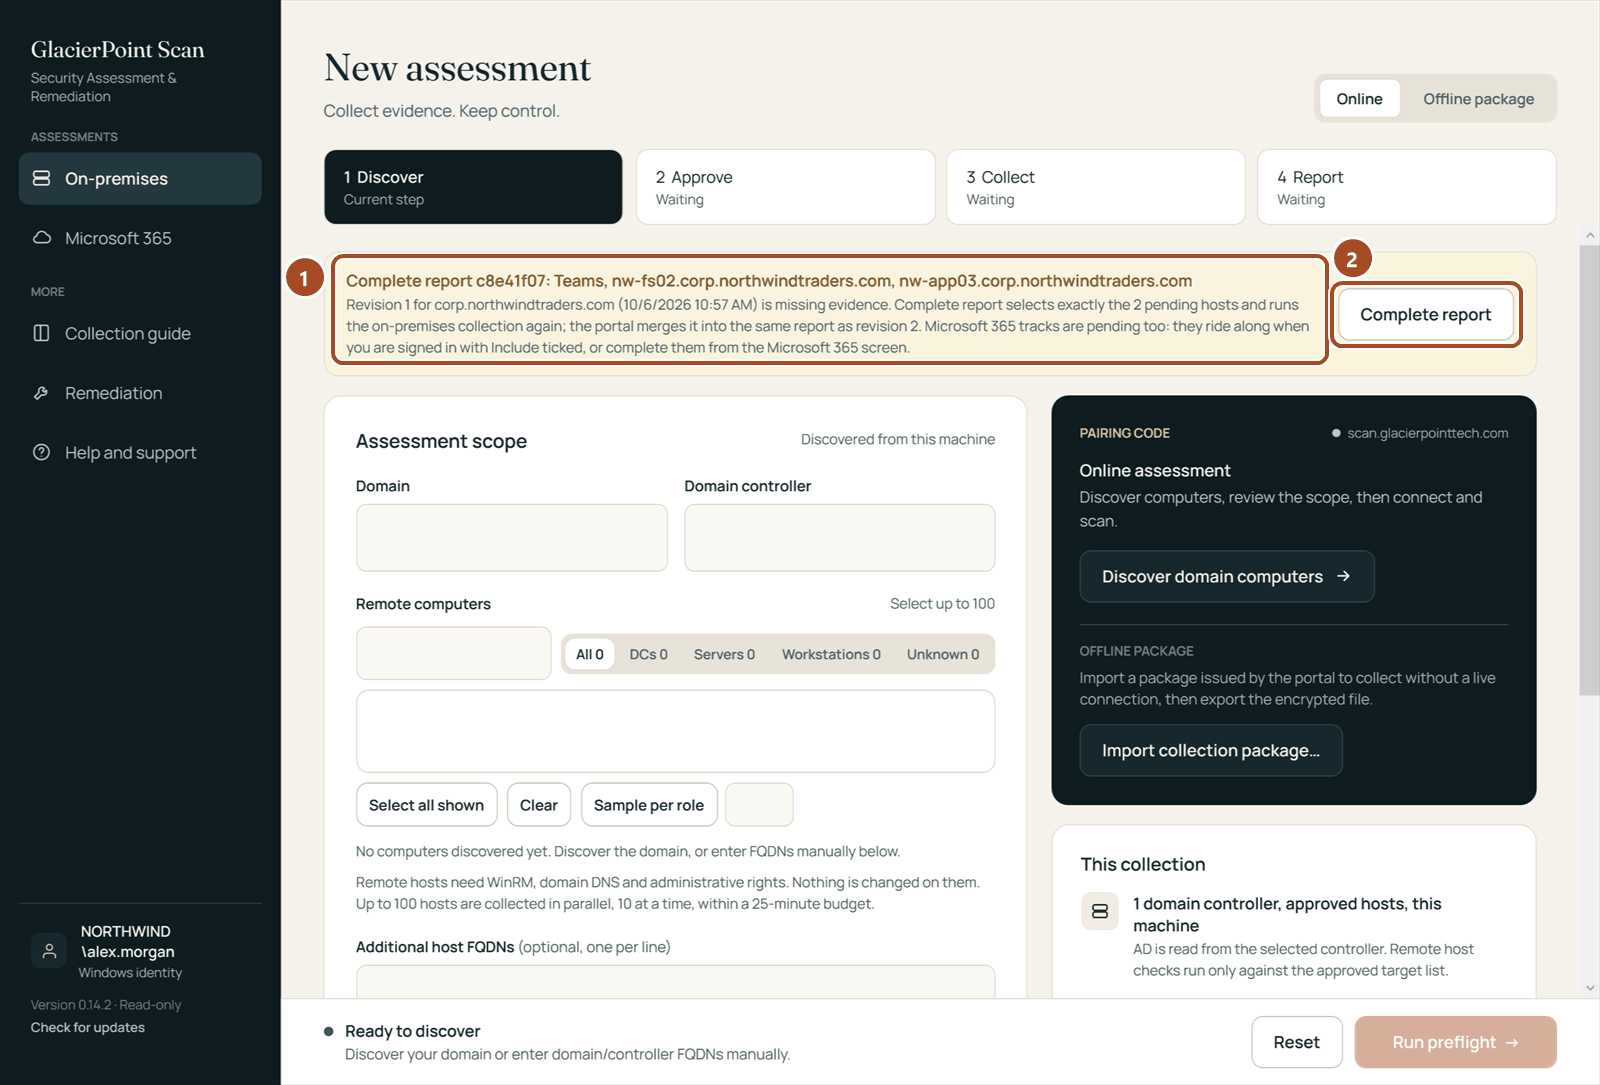
- 1The report, the parts still missing, and how the run adds them as revision 2.
- 2Complete report selects exactly the missing hosts or workloads.
What you should see: "Report … updated to revision 2" in the collector, and the same report in the portal with the new revision and nothing left pending.
7. Remediation
Remediation plans are included in the Annual and MSP plans. A plan is prepared in the portal from the findings of a report, signed by the portal and applied by the collector under your administrator sign-in, on your instruction, after you confirm it. Staged changes enforce nothing until you enable them; direct settings take effect as soon as you apply them. Rollback restores recorded values where Microsoft allows; it is best-effort and may not restore every setting.
- In the portal, open the report's Review remediation and guidance link, or Remediation in the menu, and choose the assessment.
- Choose the fixes. For Active Directory, Preview category GPOs; for Microsoft 365, Build tenant plan. Review the plan: every change, its impact and how its rollback works.
- In the collector, open Remediation, enter the domain (for Microsoft 365, the tenant's initial onmicrosoft.com domain) and choose Sign in and select a plan. Type the code it shows under Code from your collector on the portal's Remediation page and approve it: Approve for this collector for GPOs, or tick the confirmation and choose Authorize in collector for Microsoft 365.
- Follow the steps for your environment below, then run the next assessment: the portal closes each fix once a later collection shows it passing.
Microsoft 365: a separate sign-in for changes
The plan opens in the collector with one card per operation, showing exactly what it reads, what it runs and how it is rolled back. Sign in for remediation opens Microsoft's page for a sign-in with write permissions; it is separate from the read-only sign-in of an assessment and is discarded after the run.
Read current values reads the present settings of the ticked operations without changing anything, so you can untick what you do not want. Apply selected operations runs them in order, records the value before and after each one, and stops at the first failure. Policies are created in report-only, disabled or test state and enforce nothing until you enable them; direct settings take effect as soon as you apply them, and their previous value is recorded for the rollback.
Roll back this execution restores the recorded values of the applied operations, in reverse order, where Microsoft allows; it is best-effort and may not restore every setting. The journal and a rollback script stay on the computer under your profile.
If you prefer to run the changes in your own PowerShell session, Export script in the portal downloads the plan as a script you run with -Mode Apply and, if needed, -Mode Rollback, which is best-effort in the same way. The export needs no collector: owners and operators confirm that they run the script themselves, in their own session, and the export is recorded. You run the script in your own session, under your own account; its header says so. The results of any change depend on your tenant and on Microsoft's services; review each one before you apply it.
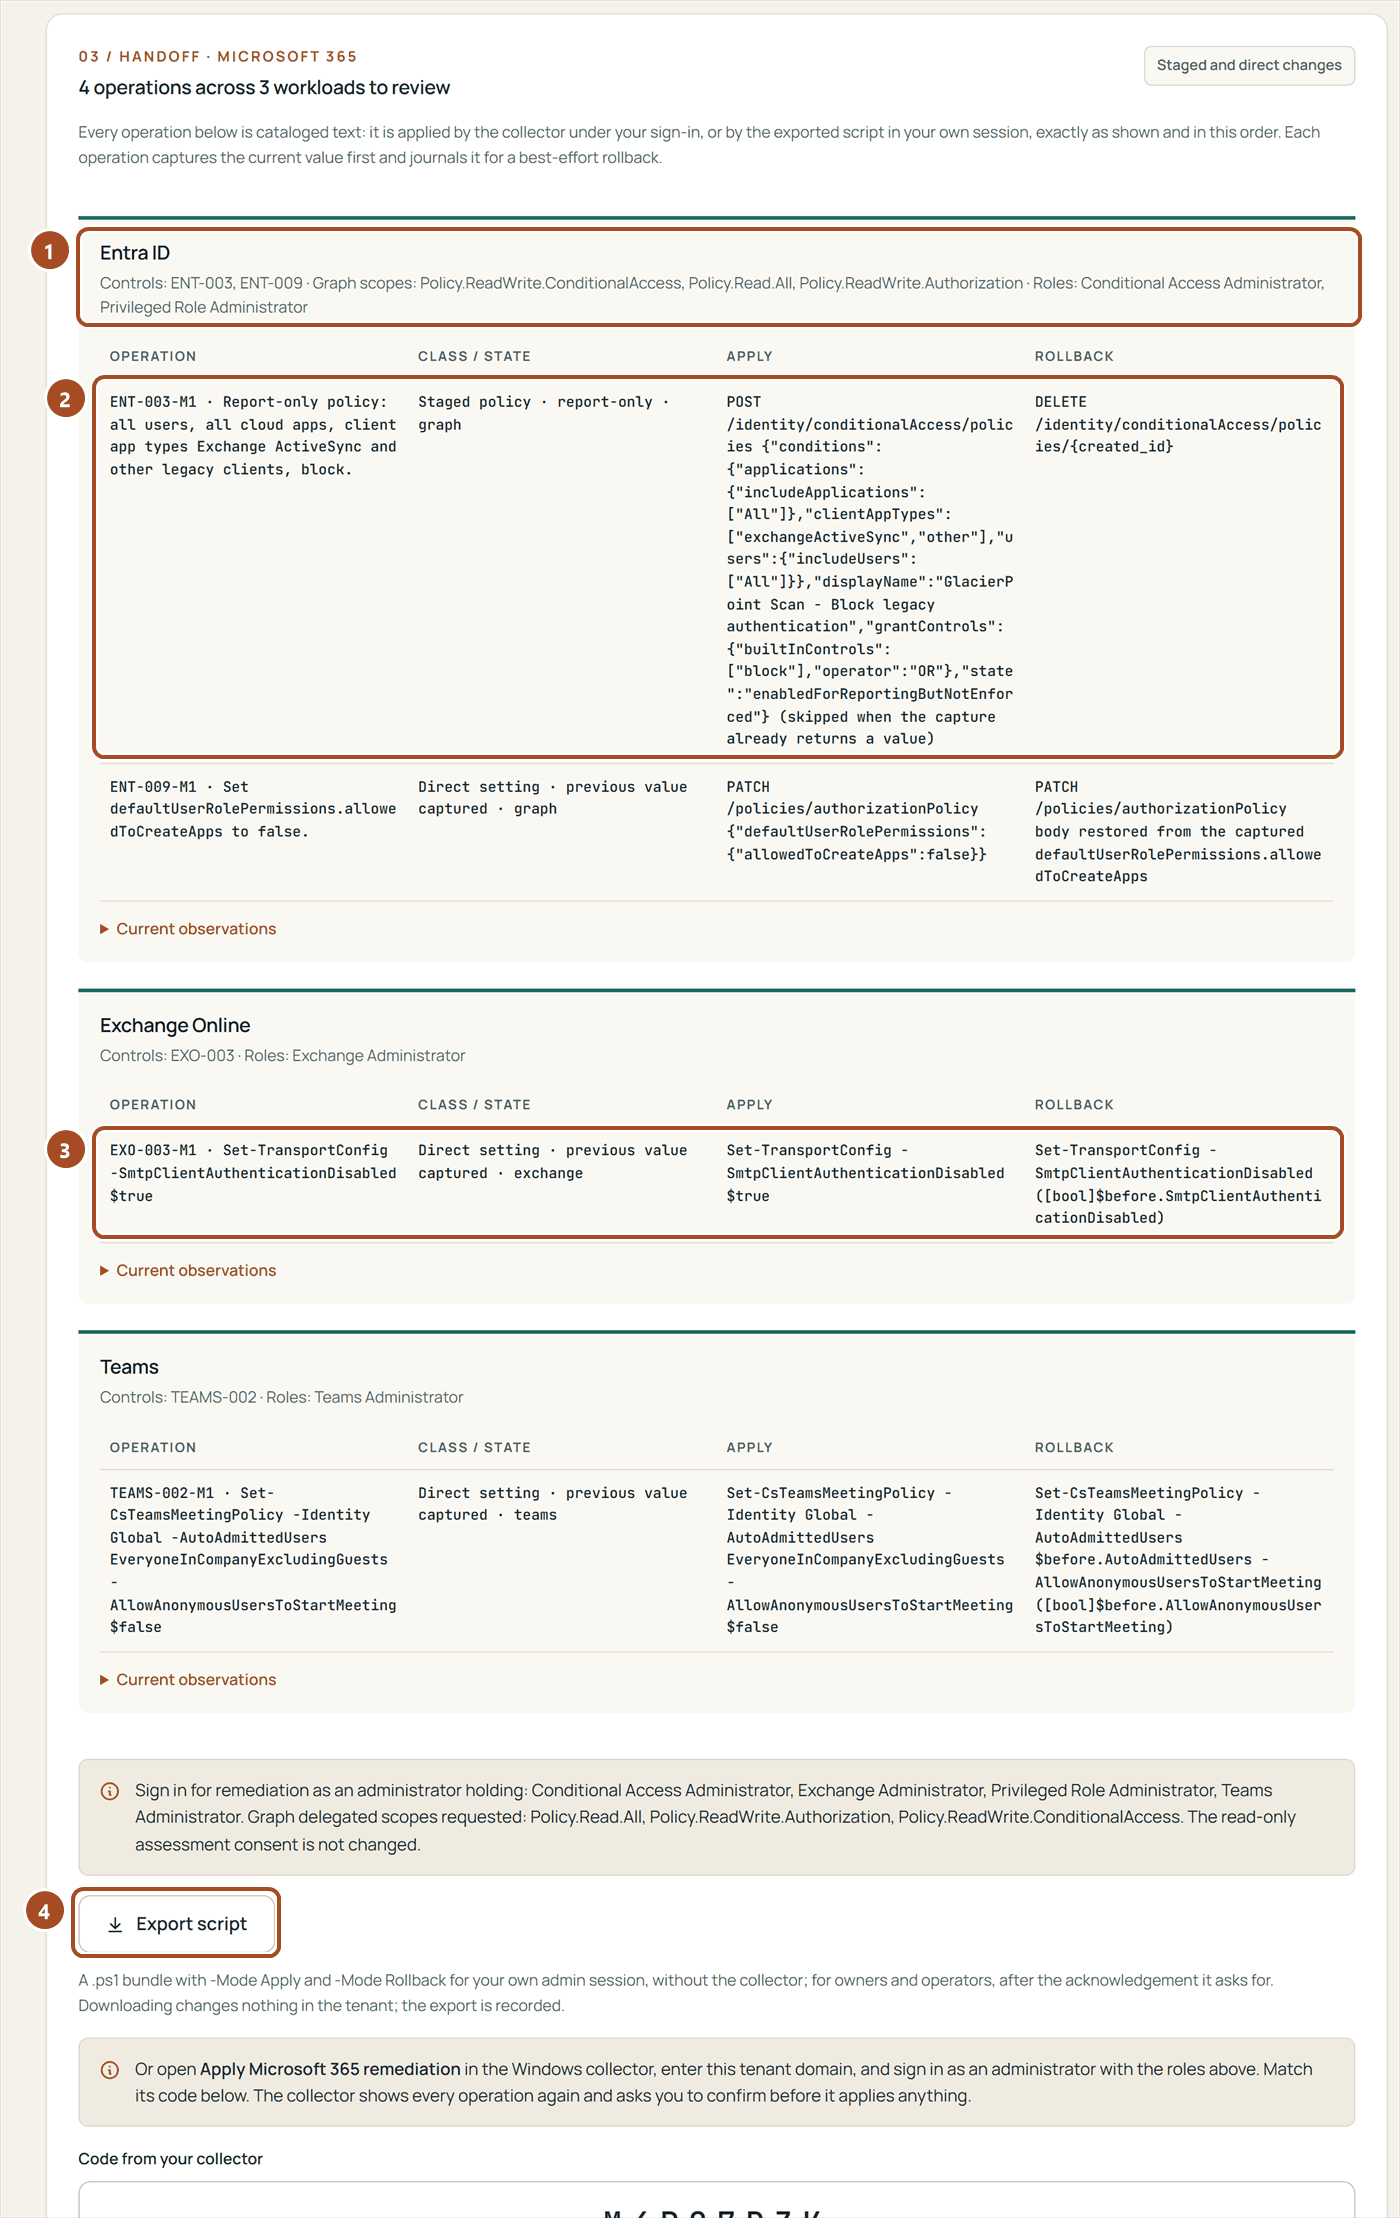
- 1One group per workload, with its controls, the Graph scopes and the administrator roles the changes need.
- 2A staged policy: created in report-only state, it enforces nothing until you enable it. The rollback deletes it.
- 3A direct setting: it changes one value, and the previous value is captured first for the rollback.
- 4Export script, the plan as a script for your own PowerShell session: for owners and operators, after a confirmation that you run it yourself.
Active Directory: unlinked GPOs
After I reviewed the plan, Create unlinked GPOs creates new Group Policy objects grouped by category and reads their settings back. They are not linked to any site, domain or organizational unit and no computer is refreshed. You link each GPO yourself in Group Policy Management, to the scope you choose, when you are ready.
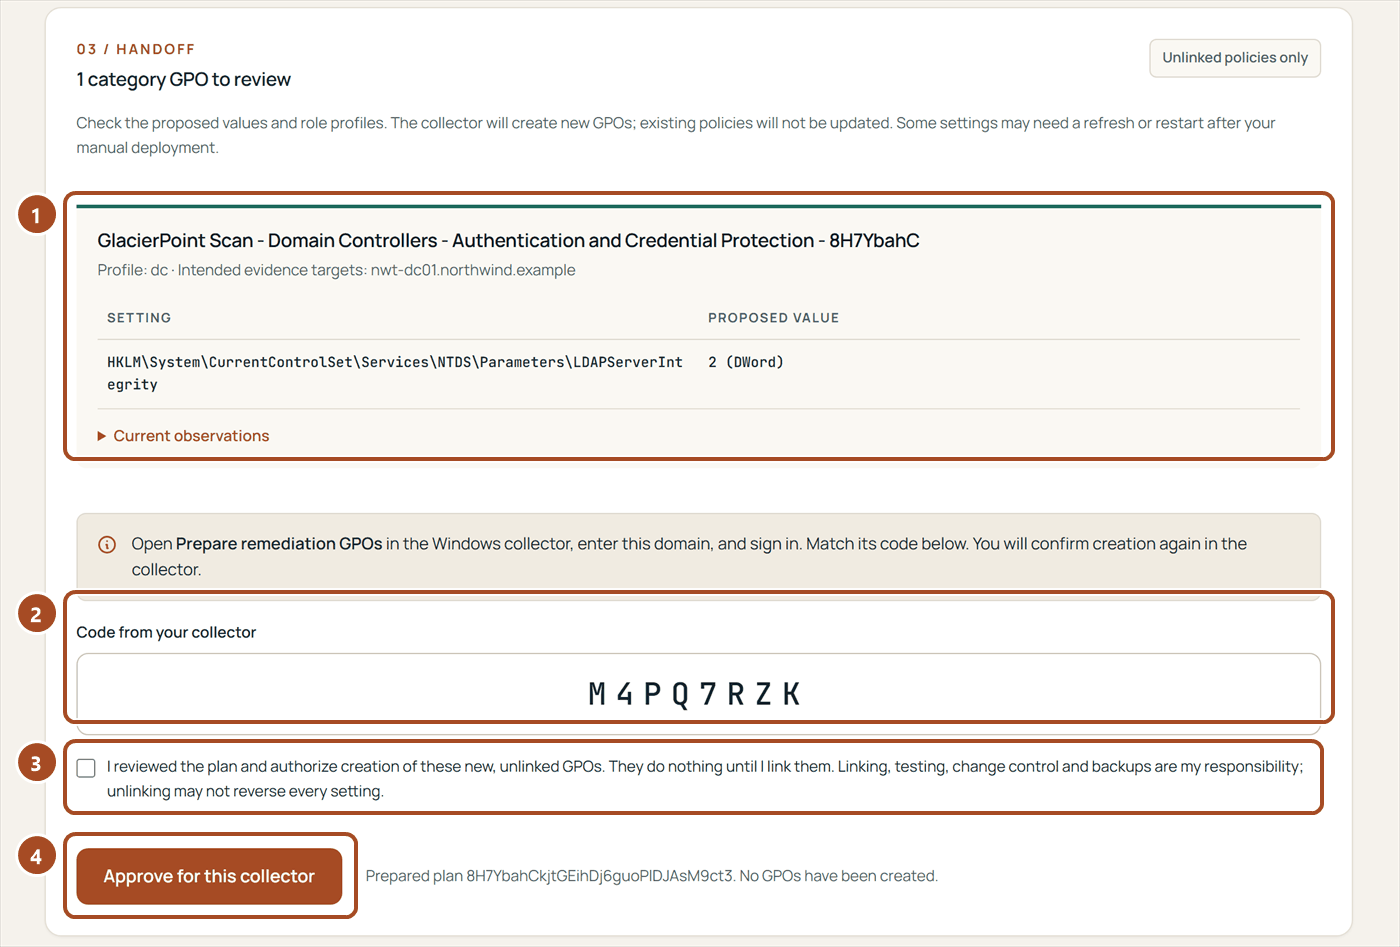
- 1Each GPO of the plan, with the settings it sets and their proposed values.
- 2The code your collector shows under Remediation.
- 3The confirmation that you reviewed the plan.
- 4Approve for this collector.
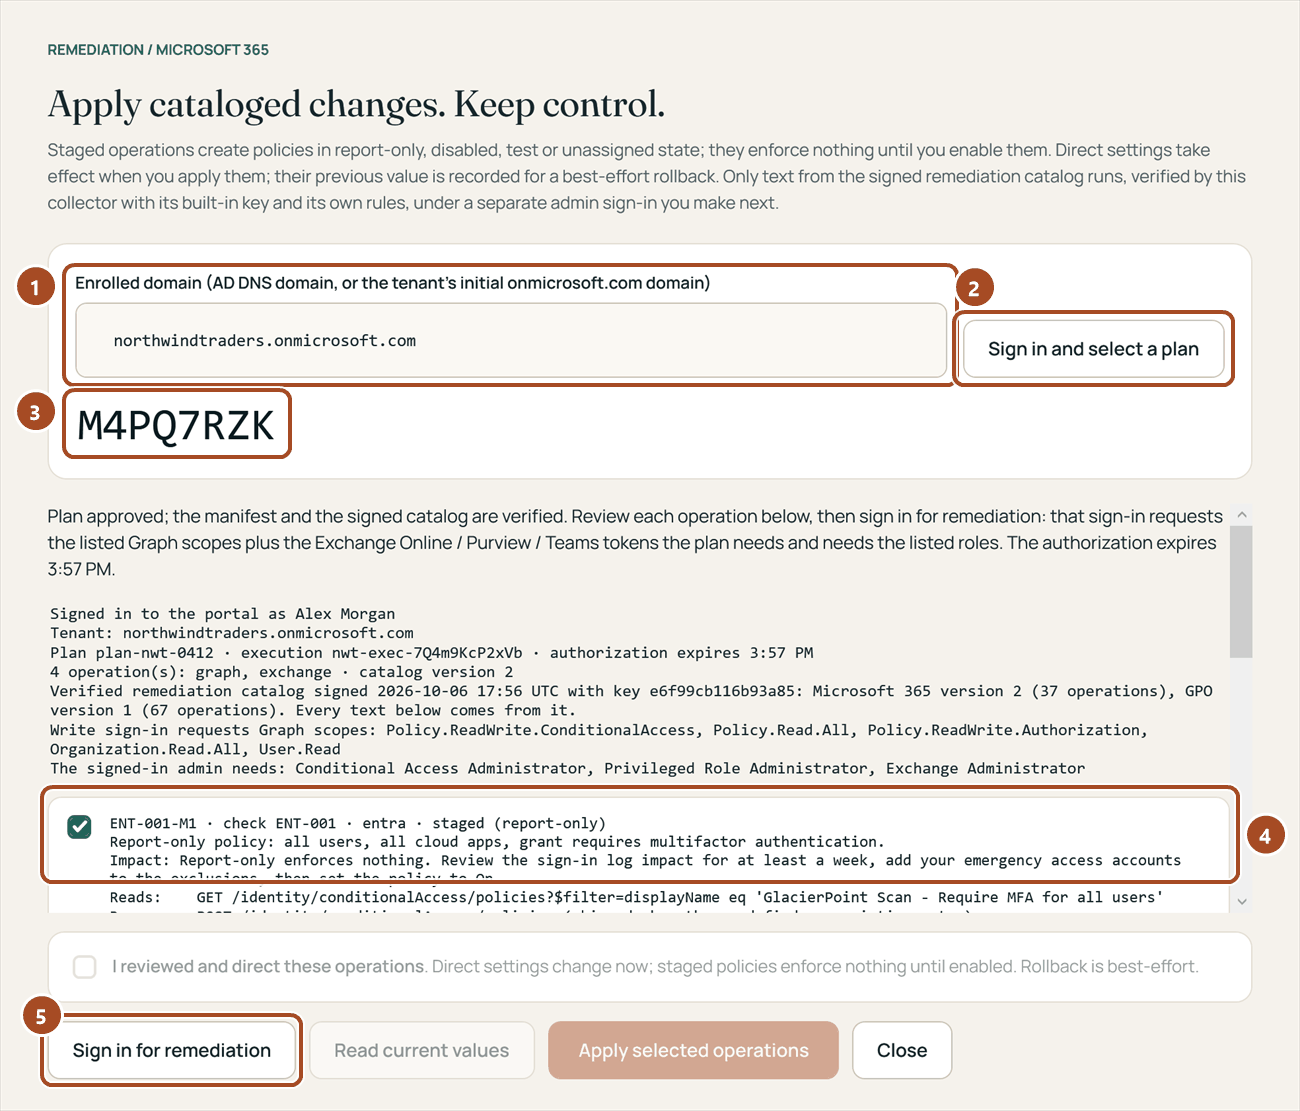
- 1The domain; for Microsoft 365, the tenant's initial onmicrosoft.com domain.
- 2Sign in and select a plan.
- 3The code to type on the portal's Remediation page.
- 4One card per operation: what it reads, what it runs and its impact.
- 5Sign in for remediation, the separate sign-in for changes.
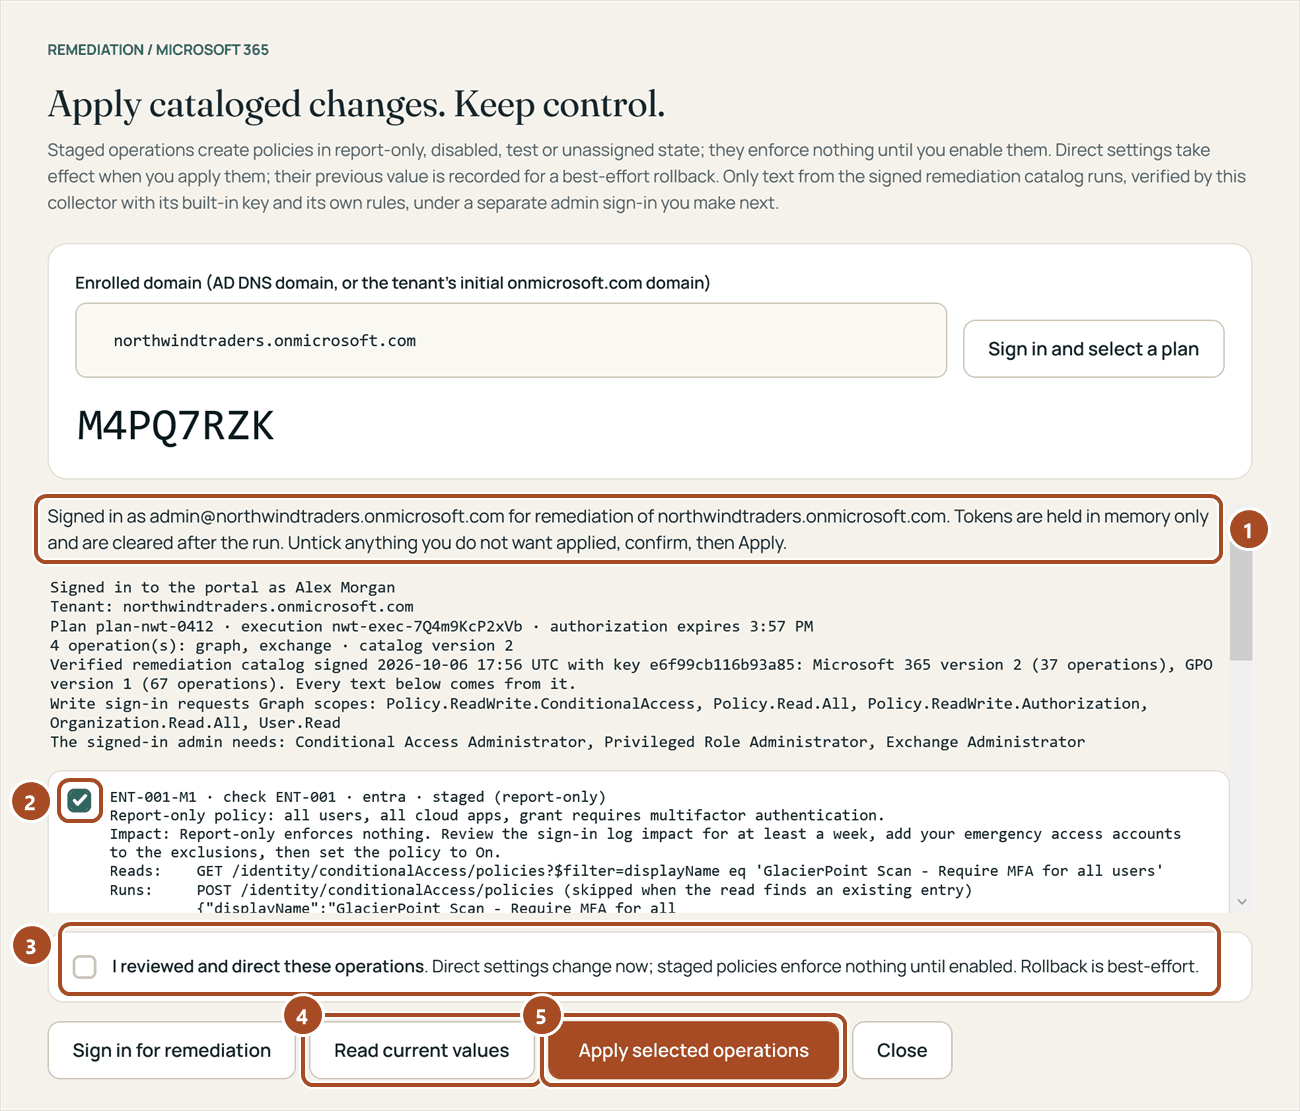
- 1The admin account of the remediation sign-in; its tokens are held in memory only.
- 2Untick an operation you do not want applied.
- 3The confirmation that you reviewed these operations and direct them: direct settings change now, staged policies enforce nothing until you enable them, and rollback is best-effort.
- 4Read current values.
- 5Apply selected operations.
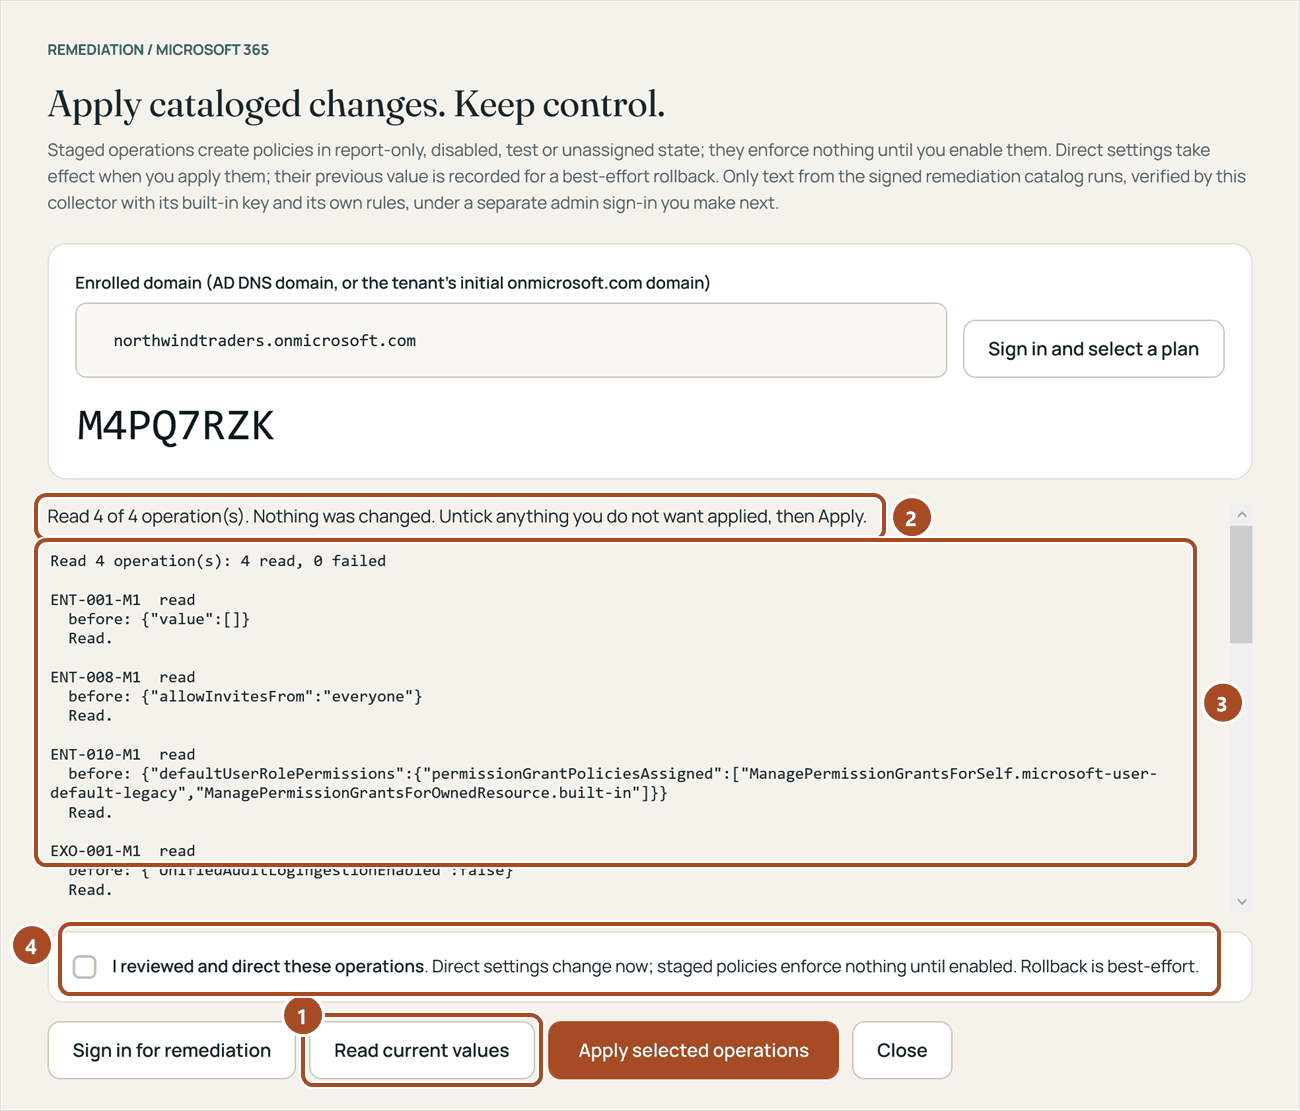
- 1Read current values.
- 2The result: what was read; nothing was changed.
- 3The present value of each operation.
- 4Tick the confirmation before you apply.
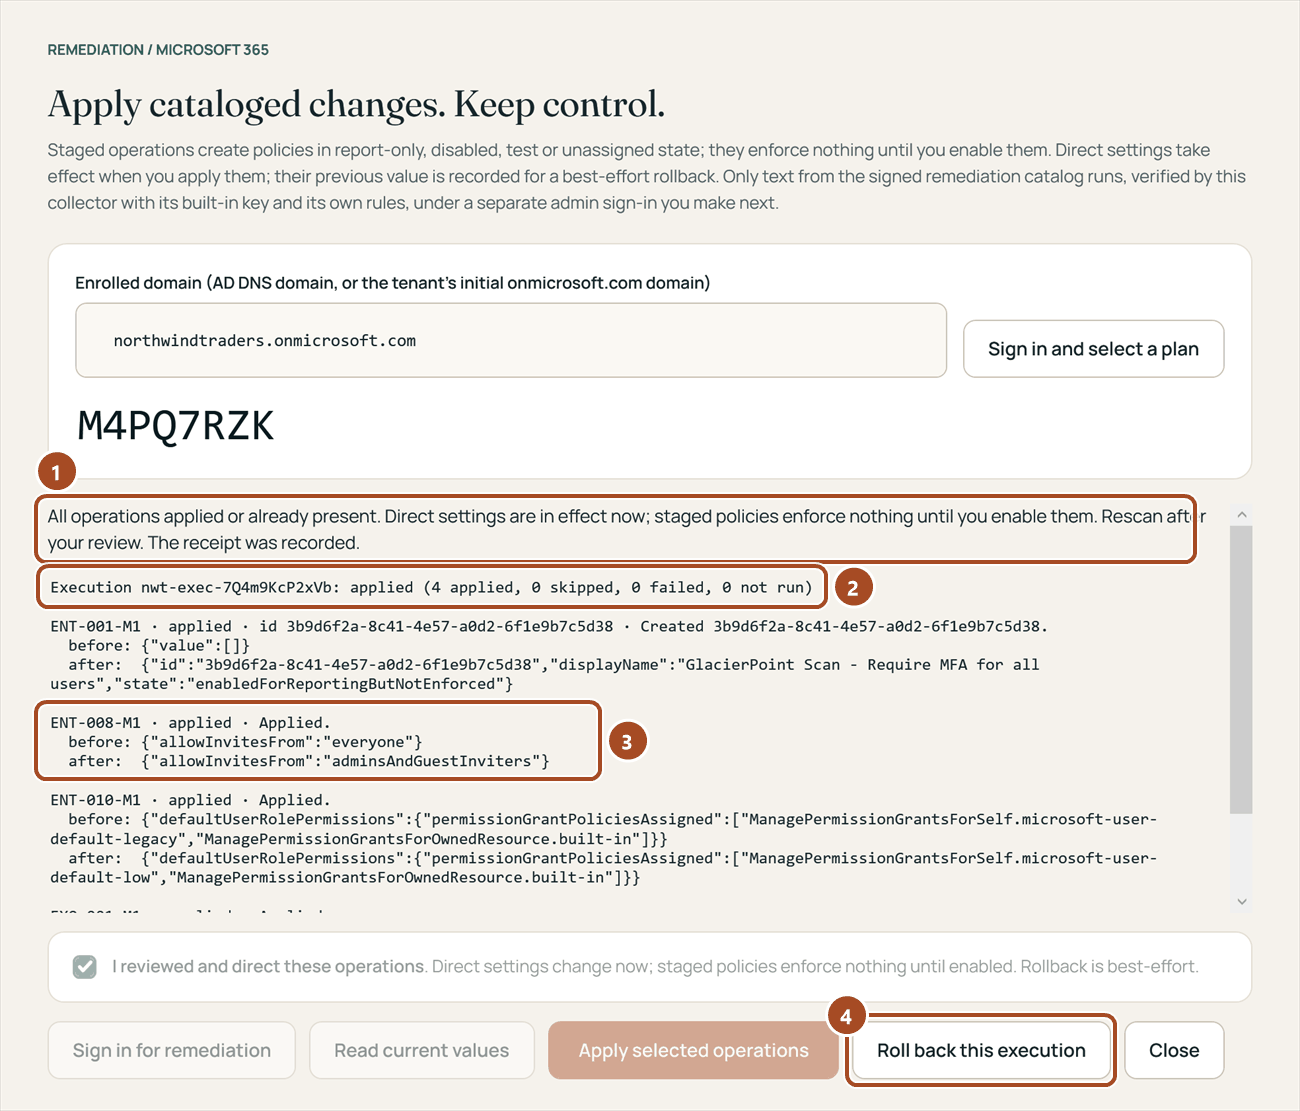
- 1The outcome of the run.
- 2The execution: applied, skipped, failed and not run.
- 3The value before and after one operation.
- 4Roll back this execution.
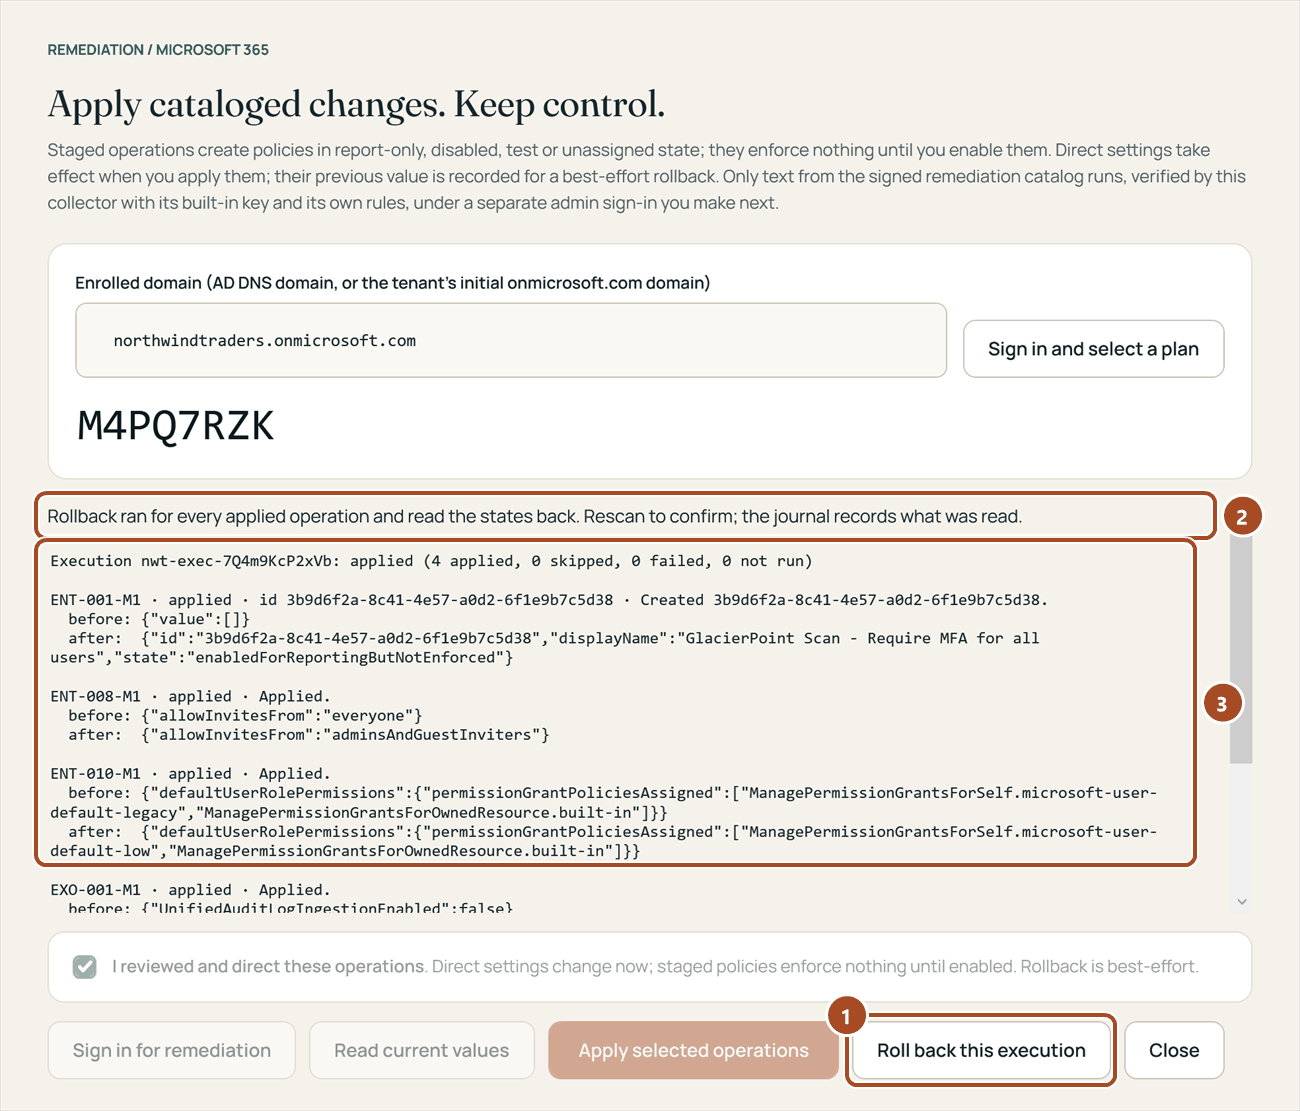
- 1Roll back this execution.
- 2The outcome; run the next assessment to see the result.
- 3The record of the execution the rollback works from.
What you should see: for Microsoft 365, every operation marked applied or skipped with its before and after values; for Active Directory, the new GPOs in Group Policy Management, not linked.
8. Your workspace
Everything about the workspace is on the Settings page. Owners make the changes; everyone else sees the same page read-only.
- Members and roles. Under Who can sign in, an owner invites a colleague by email address with a role: Owner (everything, including environments, members and support access), Operator (assessments and remediation plans) or Viewer (assessments and reports, without remediation). Choose Invite: the colleague receives an invitation by mail, and the list shows the address as Invited, pending until they answer. No account is created for them and they see nothing of the workspace until they accept. An owner can Send again or Revoke a pending invitation; it ends by itself after 14 days. Inviting the address of an existing member changes their role. The last owner cannot be removed.
- Accepting an invitation. The invited colleague opens the link in the mail and signs in with the invited address, with an emailed code (or signs up first, which gives them a workspace of their own). The page then shows the workspace, who invited them and the role, with Accept and Decline; only the invited address can answer. Accepting opens the workspace. Someone who already has a workspace also finds the invitation in Settings, under Invitations and your workspaces, where they can also open any of their other workspaces.
- Environments. The domains and tenants you assess, each with its plan, its term and the collections used; a linked domain and tenant show as one.
- Activity. What happened in this workspace lists sign-ins, approvals, reports created and downloaded, membership changes, support access and unlocks, with who did it and when.
- Support requests. On the Help page, write to support; the portal adds your workspace, plan, environments, collector version and the report you choose, so you do not have to describe them. The reply comes to the address you signed in with.
- Support access. If support needs to look at your reports, an owner chooses Grant access for a number of hours (1 to 168, 24 by default). Support can then read the workspace, but not change anything, until the time runs out or an owner chooses Revoke. Every support view is recorded in the activity.
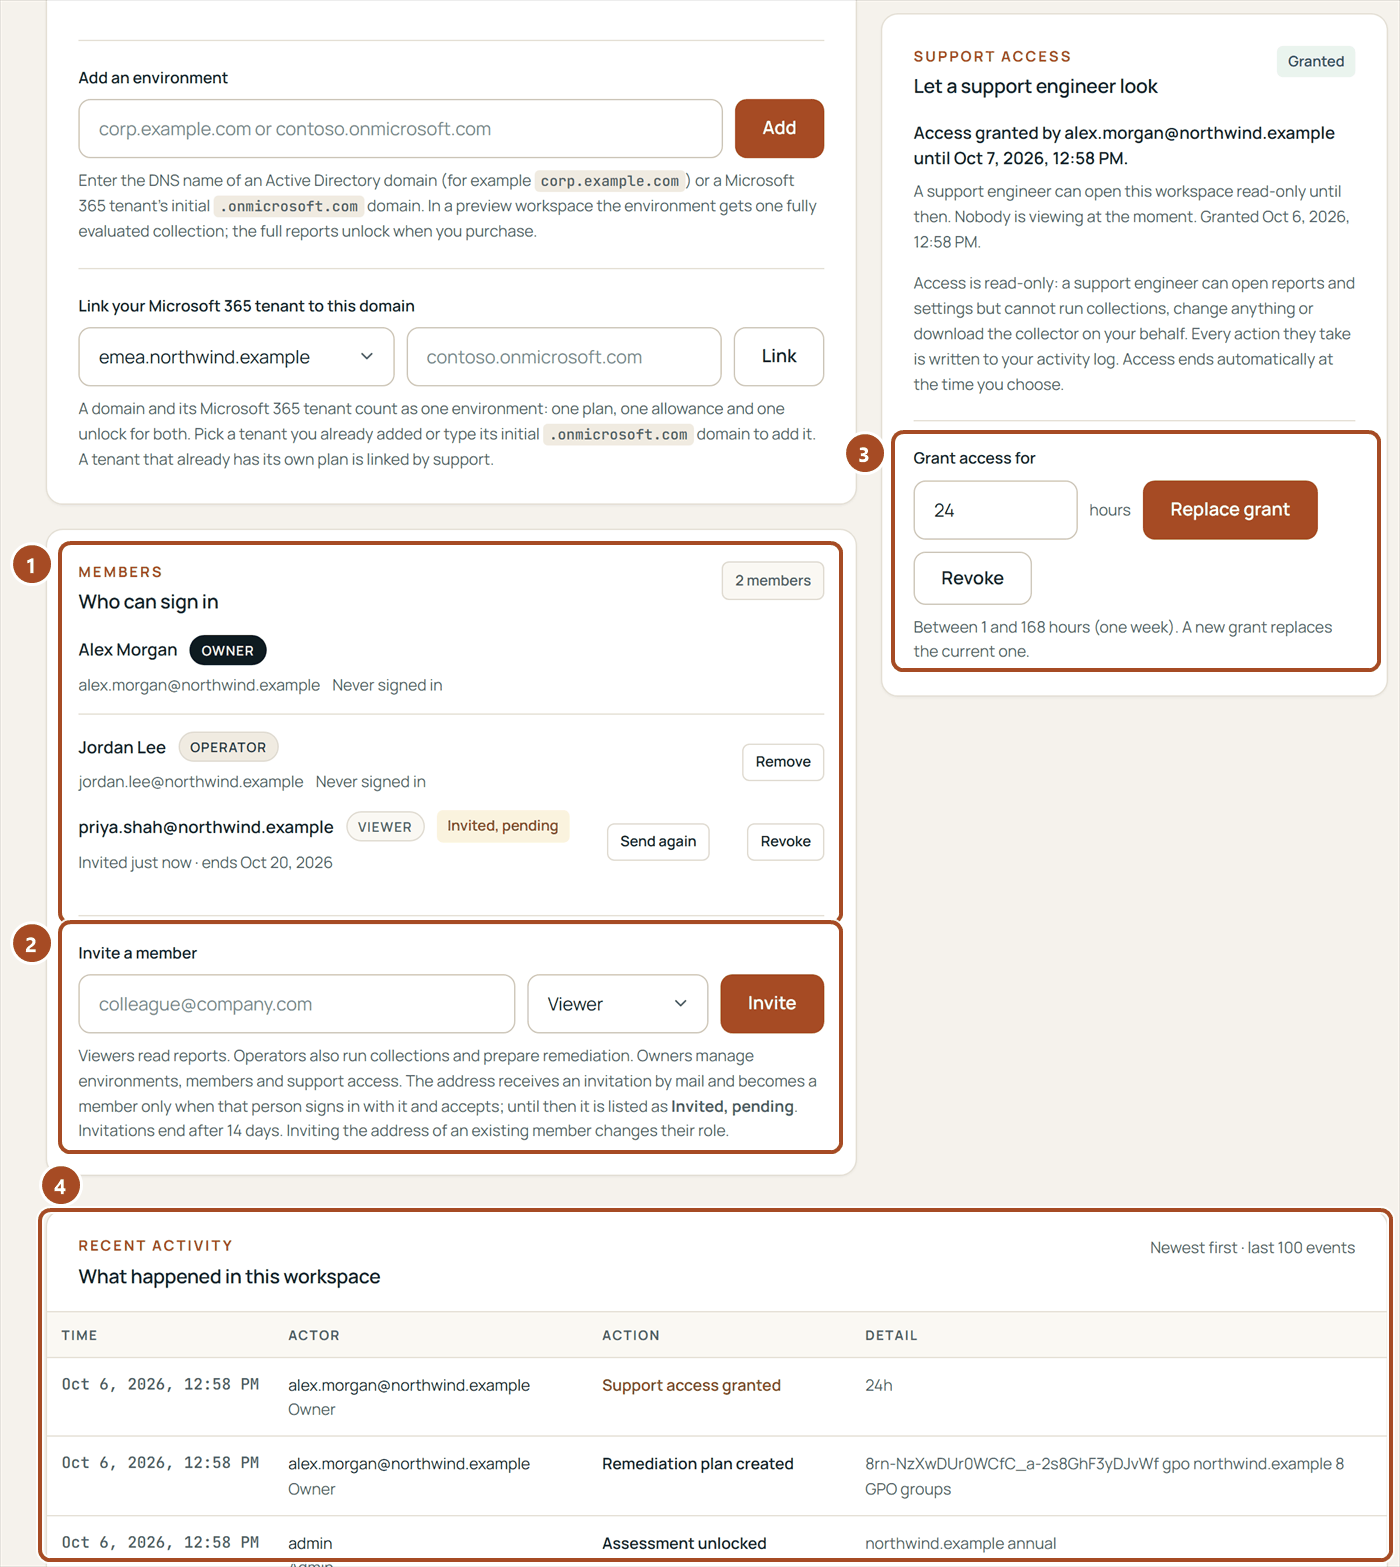
- 1Who can sign in, with each member's role, and invitations still pending (Invited, pending) with Send again and Revoke.
- 2Invite a member: an email address and a role; Invite sends the invitation by mail.
- 3Support access: the number of hours, Grant access (Replace grant while one is active) and Revoke.
- 4What happened in this workspace: the activity, newest first.
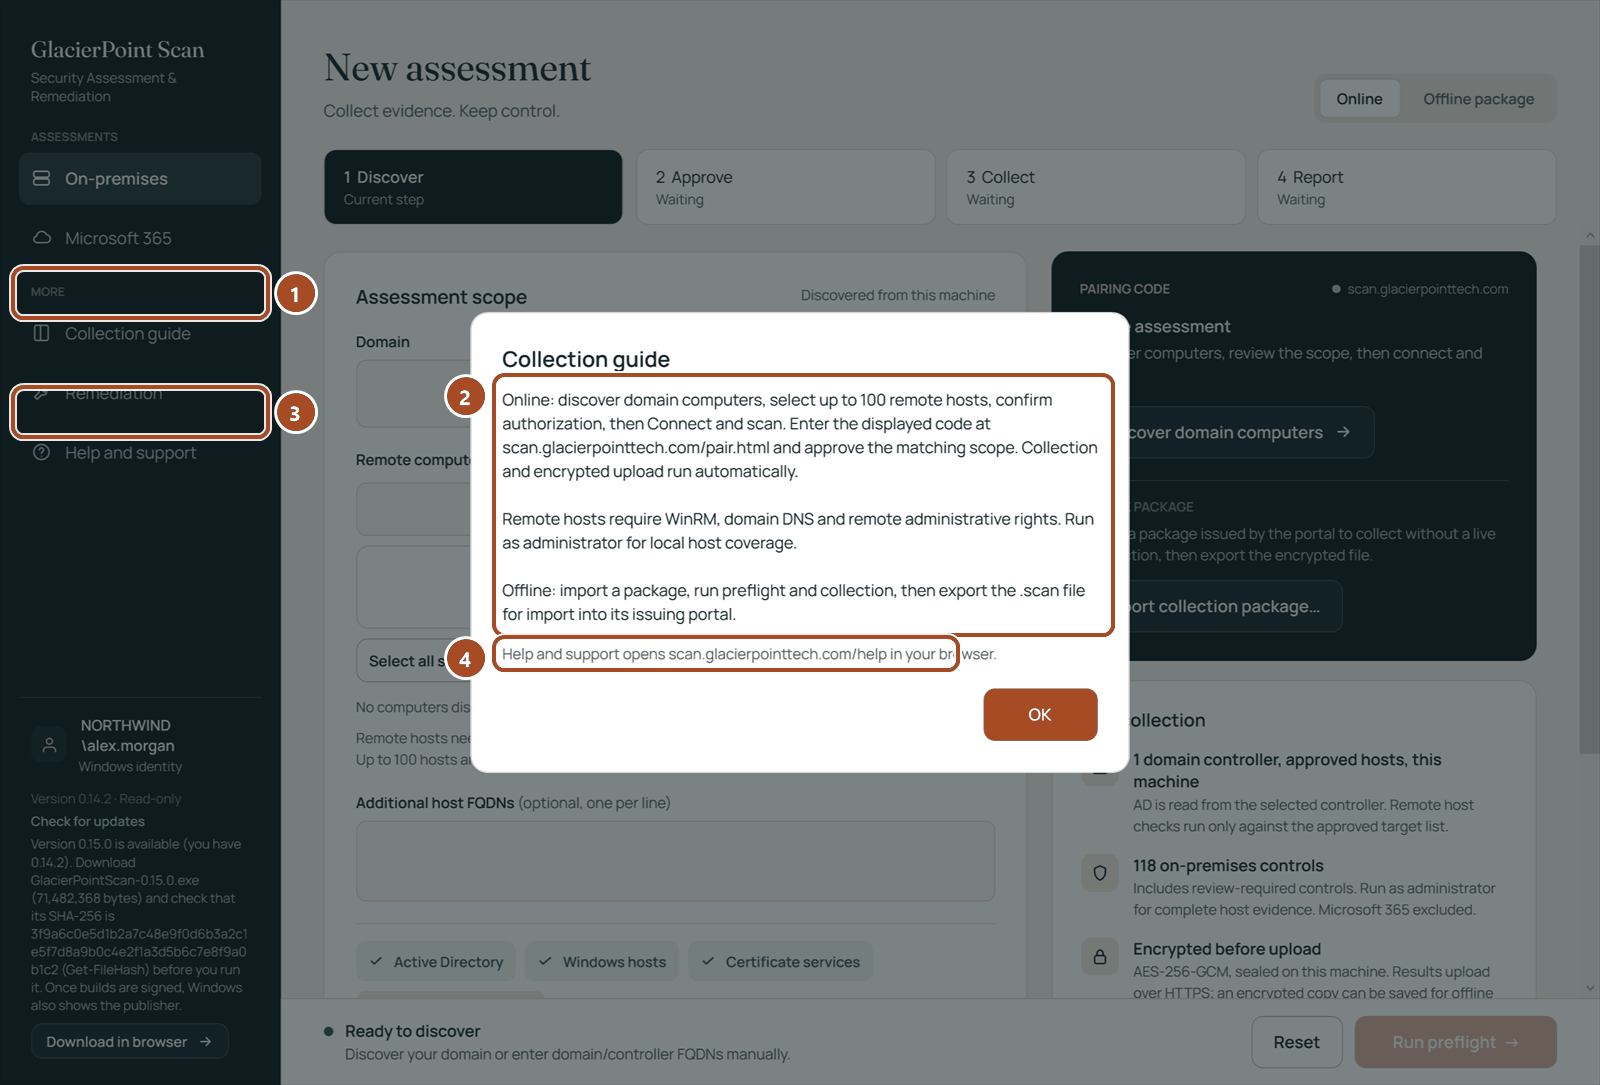
- 1Collection guide shows a short summary of a run.
- 2The summary of an online and an offline collection.
- 3Help and support opens the portal's Help page in your browser.
- 4Where Help and support goes.
What you should see: your colleagues listed under Who can sign in with their roles, and each of your actions in the activity.
9. Plans
Every plan collects and evaluates the full catalog of controls; plans differ by how often you assess, how long reports are kept and whether remediation is included. Prices are on the pricing section of the website.
- One-time assessment. One collection and one verification rescan within 30 days. Executive brief and technical report. Reports kept 30 days. Remediation available as an add-on per environment.
- Annual. Four collections a year, with verification rescans. Executive brief and technical report. Reports kept 12 months, so the year-over-year change shows. Remediation plans included: unlinked GPOs for Active Directory; for Microsoft 365, staged policies and individual settings that take effect when you apply them.
- MSP. Unlimited collections across all your client environments. Client-ready brief, no platform fee. Reports kept 12 months. Remediation plans included, as in Annual.
An environment is one Active Directory domain or one Microsoft 365 tenant; a domain and its tenant count as one once they are linked in Settings (chapter 2), so a hybrid organization buys one plan. A run that collects both, the domain only or the tenant only is one collection of that plan. Completion runs never count as collections. To change plans or add environments, talk to sales.
What you should see: your plan, its term and the collections used next to each environment in Settings.